Table of Contents

When the internal support team is already handling laptop tickets, password resets, and shared mailbox requests, access approvals become one of the most unpredictable tasks. Employees request access; the support team gathers missing information; managers approve requests in separate Slack threads; and someone grants access and notes the result.
Access requests may relate to software seats, databases, private Slack channels, shared mailboxes, Notion spaces, Google Drive folders, sensitive Salesforce or Zendesk records, and 1Password credentials; each request should have a designated approver and a person responsible for granting access.
In the Internal Helpdesk version of ClearFeed, Approval Workflows make this process easier to manage in Slack. Employees submit structured requests; their managers then approve or reject them in Slack, and the decisions link to the ticket. After that, the support team can either grant access manually or route approved requests to a provisioning system.
This guide shows you how to build an access approval workflow in Slack with ClearFeed, from collecting request details and routing approvals to looking up managers through Okta and configuring what happens after approval or rejection.
Why Automate Access Approvals?
- Less manual chasing. A request form collects all the necessary details upfront, and routing rules send requests to the right approvers. With a self-service catalog, employees can request access and obtain manager approval before a provisioning system grants it.
- Consistent approval rules. Workflows follow the policies you configure, including exceptions such as a separate approval chain for Finance. As a result, the team no longer needs to determine which approval process applies to every ticket.
- A record of each decision. The ticket shows who approved access, when, and why, along with any comments and skipped steps. If someone questions a decision later, the team can refer back to that history.
- Less administrative work and shorter waits. An Okta-commissioned Forrester study modeled up to a 60% reduction in manual effort by year three across access requests, certifications, and entitlements. Automation can also shorten approval cycles, although timing still depends on approver availability and the number of approval steps.
Which Tool Should You Use for Slack Access Approvals?
Choose based on the process you need to run and the systems you already maintain. The table below offers a useful side-by-side comparison of the main options:
Here’s a closer look at where each option works best, along with the trade-offs to consider before you choose.
Method 1: Slack Workflow Builder
Best for: Teams with a small number of straightforward requests that want to get started quickly.
Pros
- You can build and maintain a basic workflow without writing code.
- Employees and approvers handle requests inside Slack.
- Connector steps can perform supported actions in other tools.
- Conditional branches route requests based on form answers or button clicks. These require an eligible Business+ or Enterprise plan.
Cons
- Workflow Builder requires a paid Slack plan.
- Granting access requires a supported connector, a custom integration, or a manual IT step.
- You need to decide how to retain approval decisions and retrieve them later.
- Approval chains with several reviewers and exceptions take more work to configure and maintain.
Method 2: ClearFeed Internal Helpdesk
Best for: Teams that already handle IT or HR support in Slack and want access requests tracked alongside other employee tickets.
Pros
- Form submissions create tickets with approval chains selected by routing rules. You can lock selected fields during review.
- Approvers respond in Slack. ClearFeed records decisions, comments, timestamps, backup approvers, and skipped levels on the ticket. See how Approval Workflows work.
- An Okta lookup can identify the requester’s manager before approvals begin. A configured backup handles an empty or missing approver field.
- ClearFeed also supports JumpCloud for password resets; suspending, unsuspending, or deleting users; viewing assigned systems or groups; and adding or removing users from system groups.
- Access approvals are incorporated into the team’s existing helpdesk process.
Cons
- Approval and fulfillment need separate configuration. Granting access may involve an integration, a webhook to a provisioning service, or a manual IT task.
- Teams that need broad access reviews, expiry policies, and permission management across many applications may also need an identity governance platform.
Method 3: Identity Governance or Access Management Platform
Best for: Organizations managing access across many applications and infrastructure systems, with a security or governance team responsible for identity.
Options include Okta Identity Governance, SailPoint, Opal, ConductorOne, Lumos, Veza, and Entitle (now part of BeyondTrust).
Okta’s Slack integration lets users request and approve access directly within Slack. Note that is setup is separate from ClearFeed’s Okta integration.
Pros
- These platforms manage access beyond initial approval, including provisioning, removal, and periodic reviews.
- Depending on the product, they offer temporary access, permission reporting, and audit records.
- Prebuilt integrations can reduce the need to build a provisioning connection for each application.
- Some products let employees submit requests and approvers respond in Slack.
Cons
- Licensing and procurement can be a substantial commitment.
- Your team must define policies, configure the application catalog, and assign resource owners.
- Application coverage and Slack capabilities vary by product.
- The setup and ongoing administration may be more than a team with a few simple approval policies needs.
Method 4: Existing ITSM With a Slack Integration
Best for: Organizations that already use ServiceNow, Jira Service Management, or Freshservice to track internal requests.
Pros
- Requests stay in the service desk your team already maintains.
- Existing workflows, asset records, and reporting can support the approval process.
- Approvers can use other channels where supported. For example, Jira Service Management supports approvals through email and Slack.
- You can reuse provisioning integrations already configured in your IT environment.
Cons
- Some actions may still require the service desk portal. Check which steps employees and approvers can complete in Slack.
- Workflow changes may require an ITSM administrator.
- Maintaining both the service desk configuration and its Slack integration adds work.
Method 5: Custom Slack App
Best for: Organizations with engineering capacity and requirements that available products cannot meet.
Pros
- You control the approval rules, user experience, and integrations.
- You can connect requests to internal systems with custom interfaces.
- You avoid licensing a separate approval product, though development and operating costs remain.
Cons
- A team must maintain the app, including authentication, token rotation, Slack API changes, and failure recovery.
- If needed, you must build or integrate features such as access reviews, temporary permissions, and SCIM provisioning.
- Maintenance and support continue long after the first version launches.
If access requests belong in your employee helpdesk queue, ClearFeed keeps the ticket and approval history together. Configure the fulfillment step around the system that grants access.
How To Build Access Approval Workflows in Slack With ClearFeed: A Step-by-Step Guide
The policy work in steps 1–2 applies to any tool. Steps 3–8 show the ClearFeed configuration.
Step 1: Choose an Access Request To Automate First
Start with a common access request, such as a Figma Editor seat. Define the resource, available permission levels, required approvers, and the person or system responsible for granting access. For temporary access, specify when and how it will be removed.
Test whether requests reach the right approvers, approved access is granted, and temporary access is removed as expected. Once the workflow works reliably, expand to other software, data access, contractors, and production systems.
Keep permission changes separate from new access requests. Upgrading a user from member to admin or read-only to write access requires reviewing the additional permissions. Production administrator access may also require stricter approvals than a standard software seat.
Step 2: Define the Approval Policy
Define who approves the business need and requested permissions. A typical chain starts with the employee's manager, followed by an IT admin or application owner. Elevated permissions may require an independent second reviewer. Record each decision on the ticket.
Set a default route for requests that don't match specific approval rules. These requests should go to a designated reviewer and never be approved automatically.
Assign someone to handle delayed approvals when the designated approver is unavailable.
Step 3: Build the Intake Form
Create a form, such as "Software Access Request," with the information approvers need to evaluate and fulfill requests:
- Application or resource: Include the specific repository or folder when relevant.
- Permission level: Specify read, write, or administrator access.
- Business justification: Describe the task, such as "Read access to the reporting repository for the migration review," rather than "Need GitHub."
- Department or request category: Include if needed for routing.
- End date: Specify when temporary access should expire.
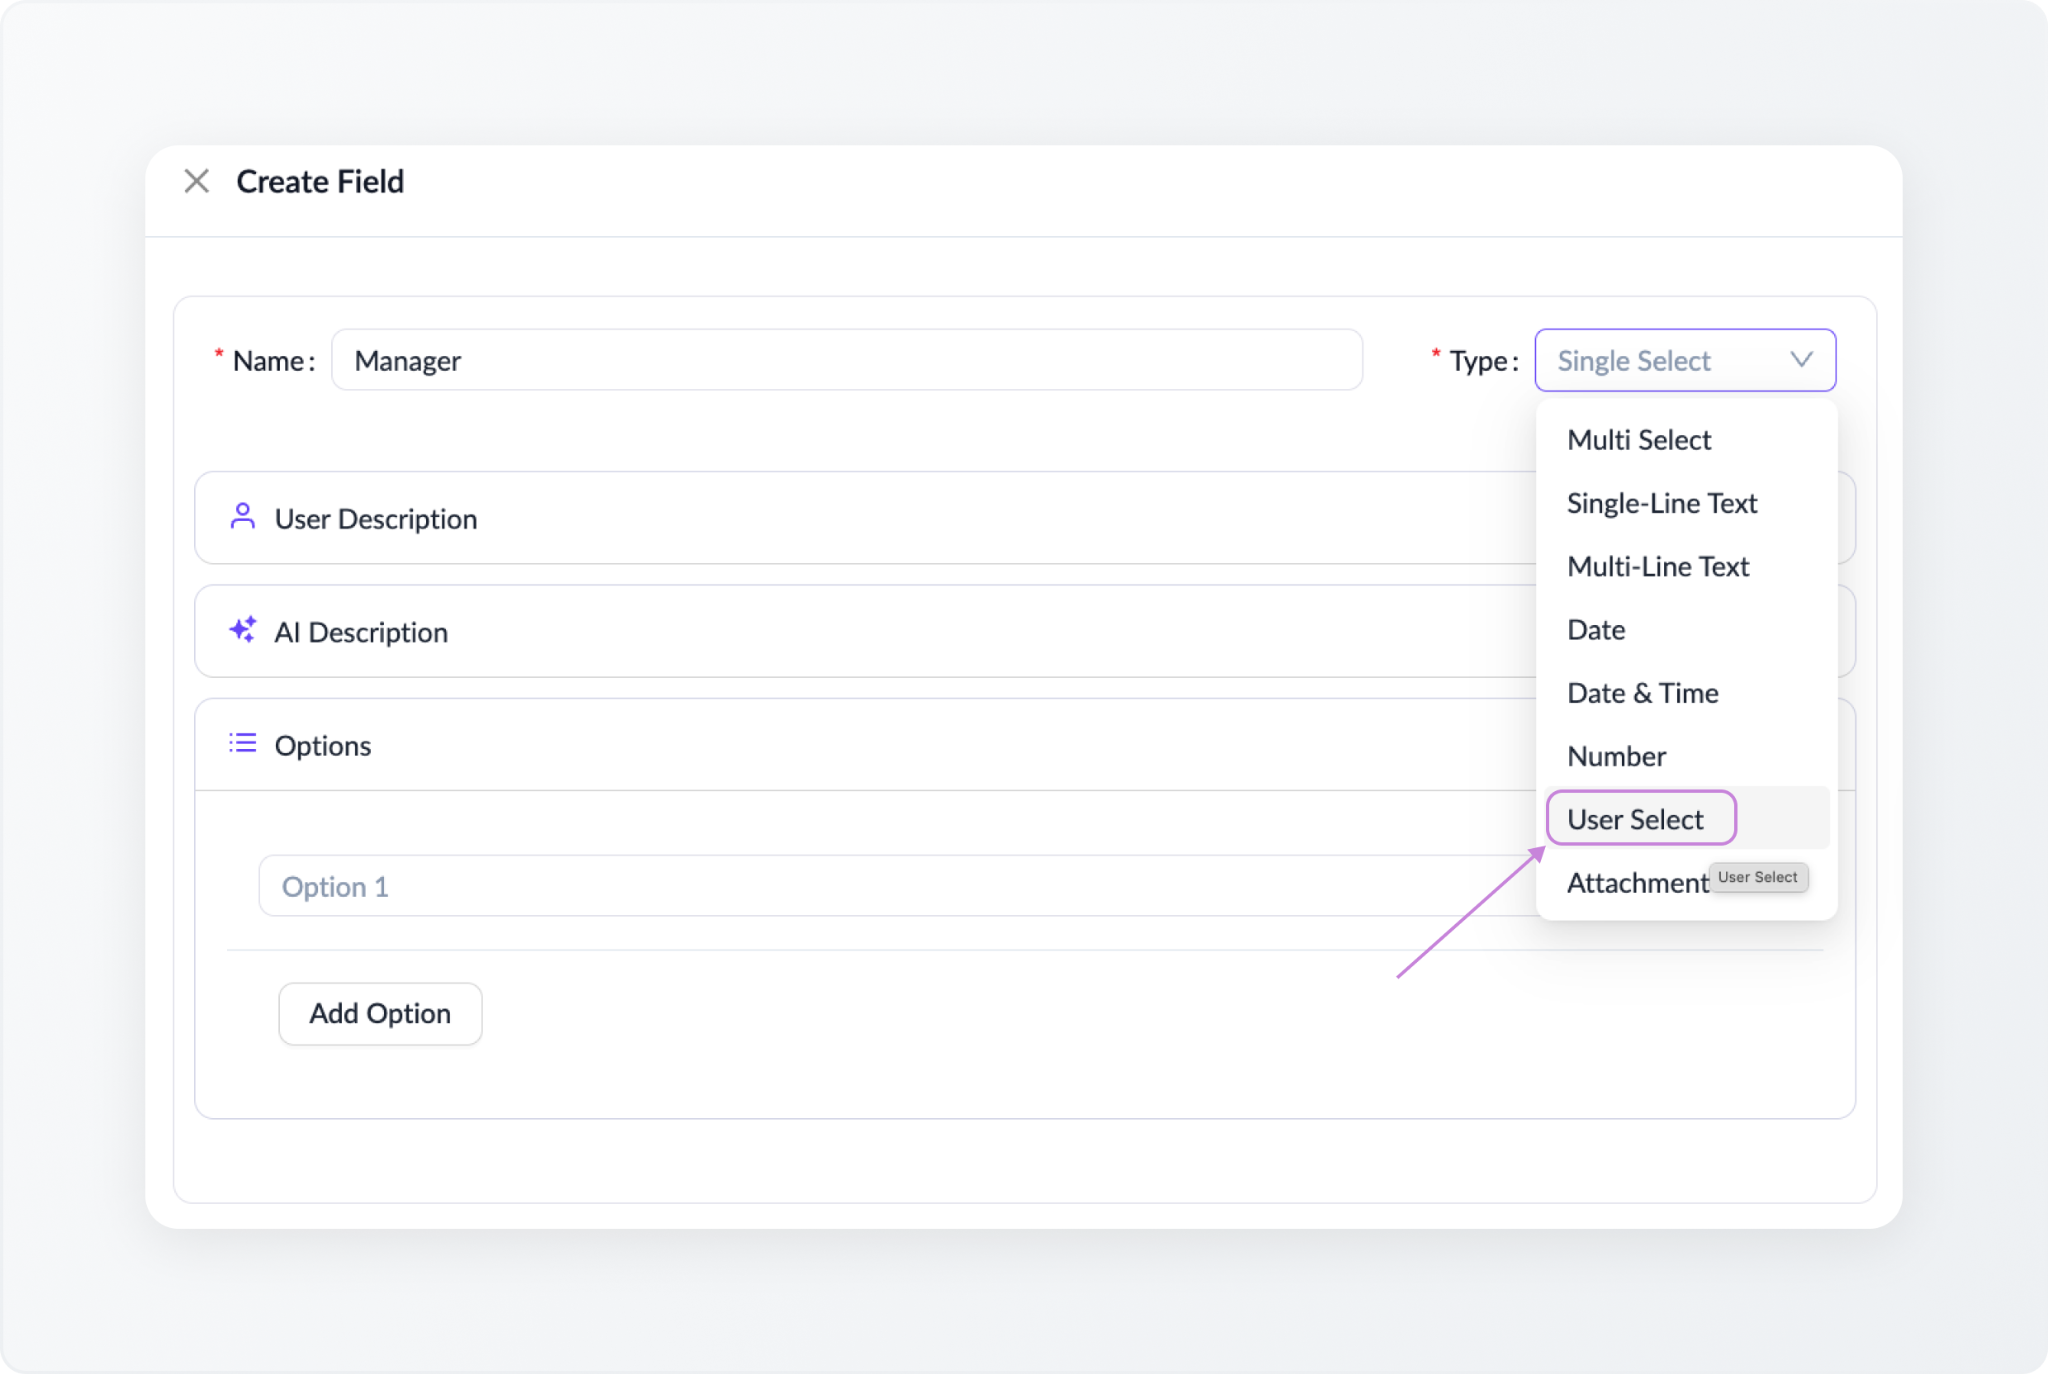
- Manager or App Owner: Use a User Select field if required for approval routing.
Collect only details that affect approval or fulfillment. Where possible, look up the employee's manager automatically instead of asking them to select one.
Step 4: Connect the Form to an Approval Workflow
In the ClearFeed web app, go to More → Approval Workflows, create a workflow, and select the intake form. Lock fields such as the requested resource and permission level to prevent changes during approval. See the Approval Workflows documentation for configuration details.
When an employee submits the form, ClearFeed automatically creates a linked approval request. The ticket cannot be closed until all approvals are complete.
Optionally, add approvers as ticket participants so they can read and respond to the conversation.
Step 5: Configure Routing Rules and Approvers
ClearFeed evaluates routing rules from top to bottom and applies the first match; all conditions within that rule must be satisfied. If none match, ClearFeed falls back to the default route. For example, you might configure these routes:
Place the Finance rule before the broader access-request rule, so Finance requests follow the more specific approval chain.
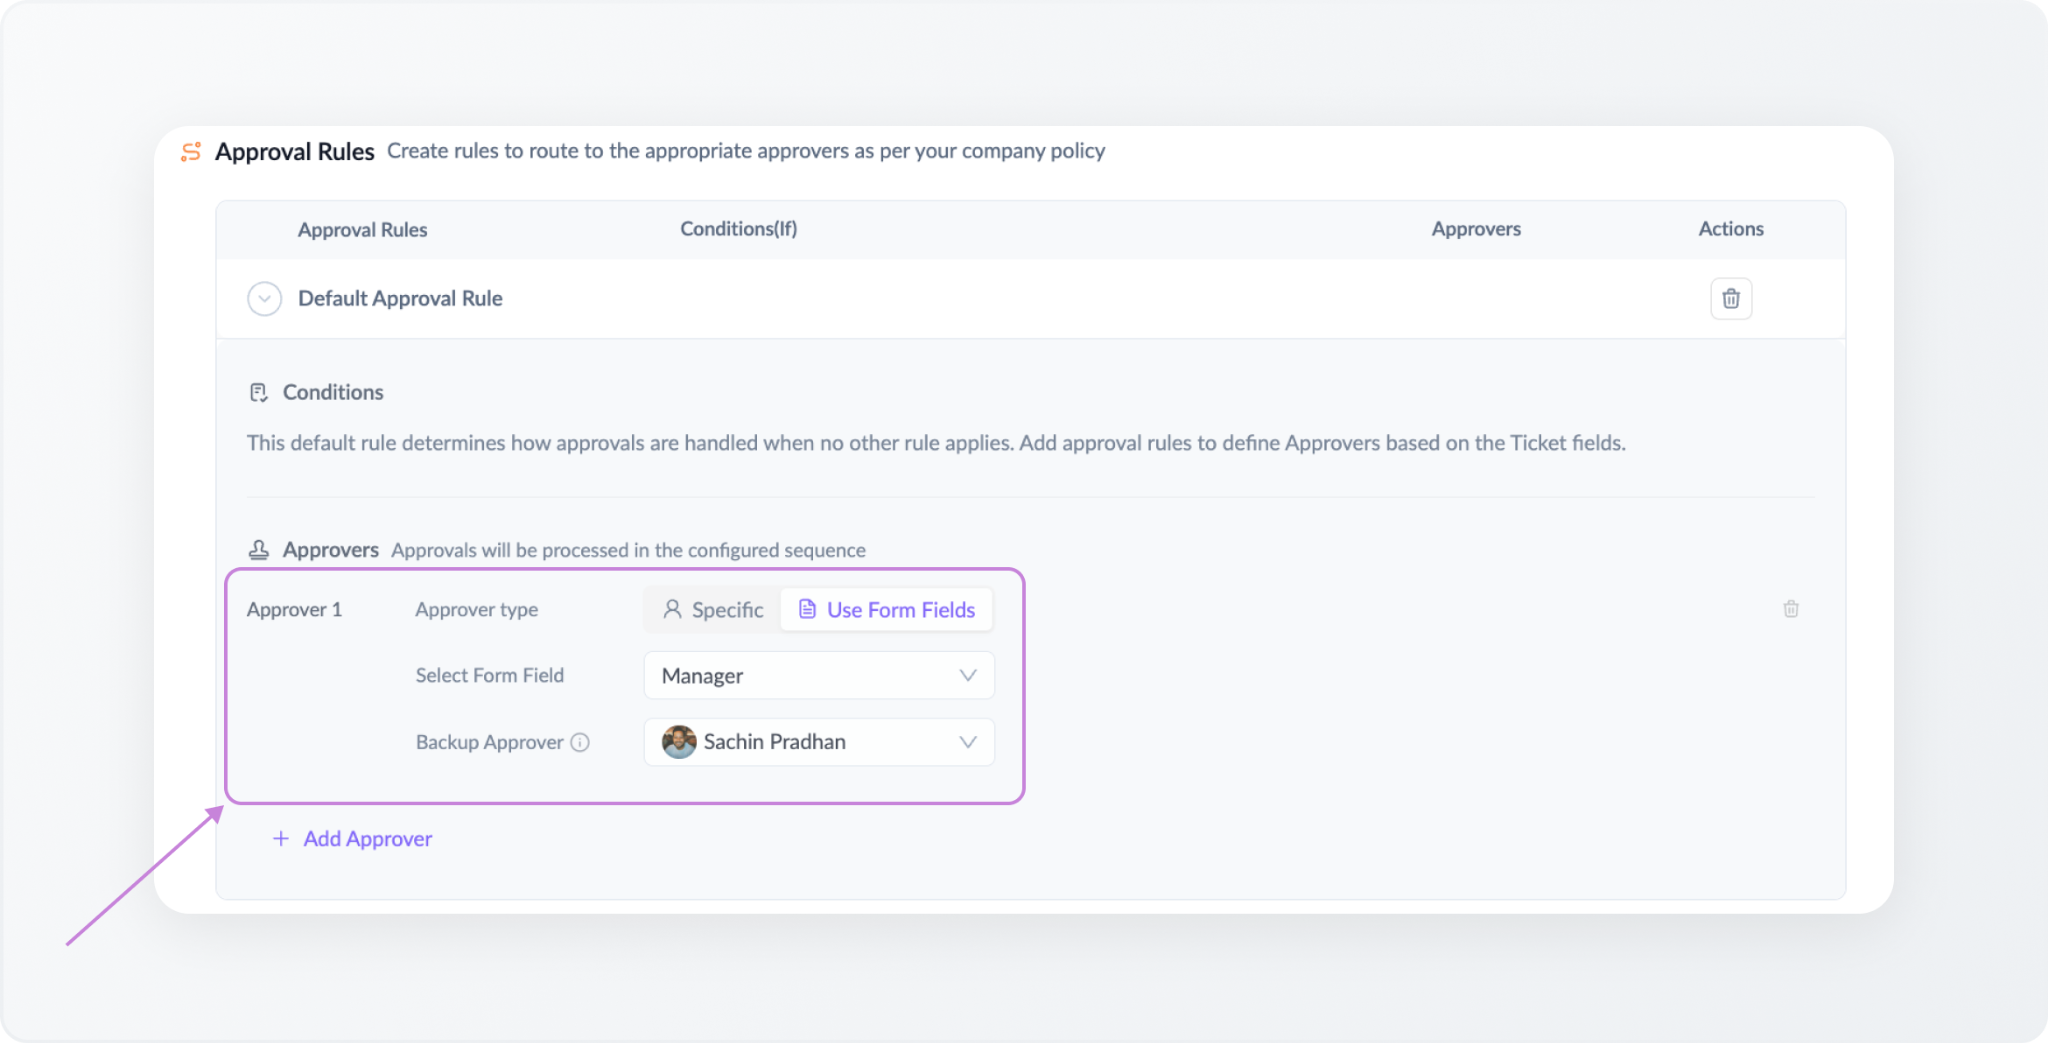
For each approval level, select Specific User for a fixed approver or From Form Field to assign one dynamically using a User Select field. Dynamic approvals require a backup approver if the field is empty or removed from the form.
If the same person appears at multiple levels, ClearFeed requests their approval once and skips the higher level. For policies requiring two independent reviewers, test that the chain assigns different people.
Step 6: Look Up the Manager Through Okta
If your company stores manager data in Okta, ClearFeed can automatically fetch it before the approval workflow begins. Requesters then don't have to choose their manager.
First, connect Okta and check that the requester emails match between ClearFeed and Okta. Then follow the dynamic approvers recipe:
- Create a Manager field with the User Select type and add it to the intake form.
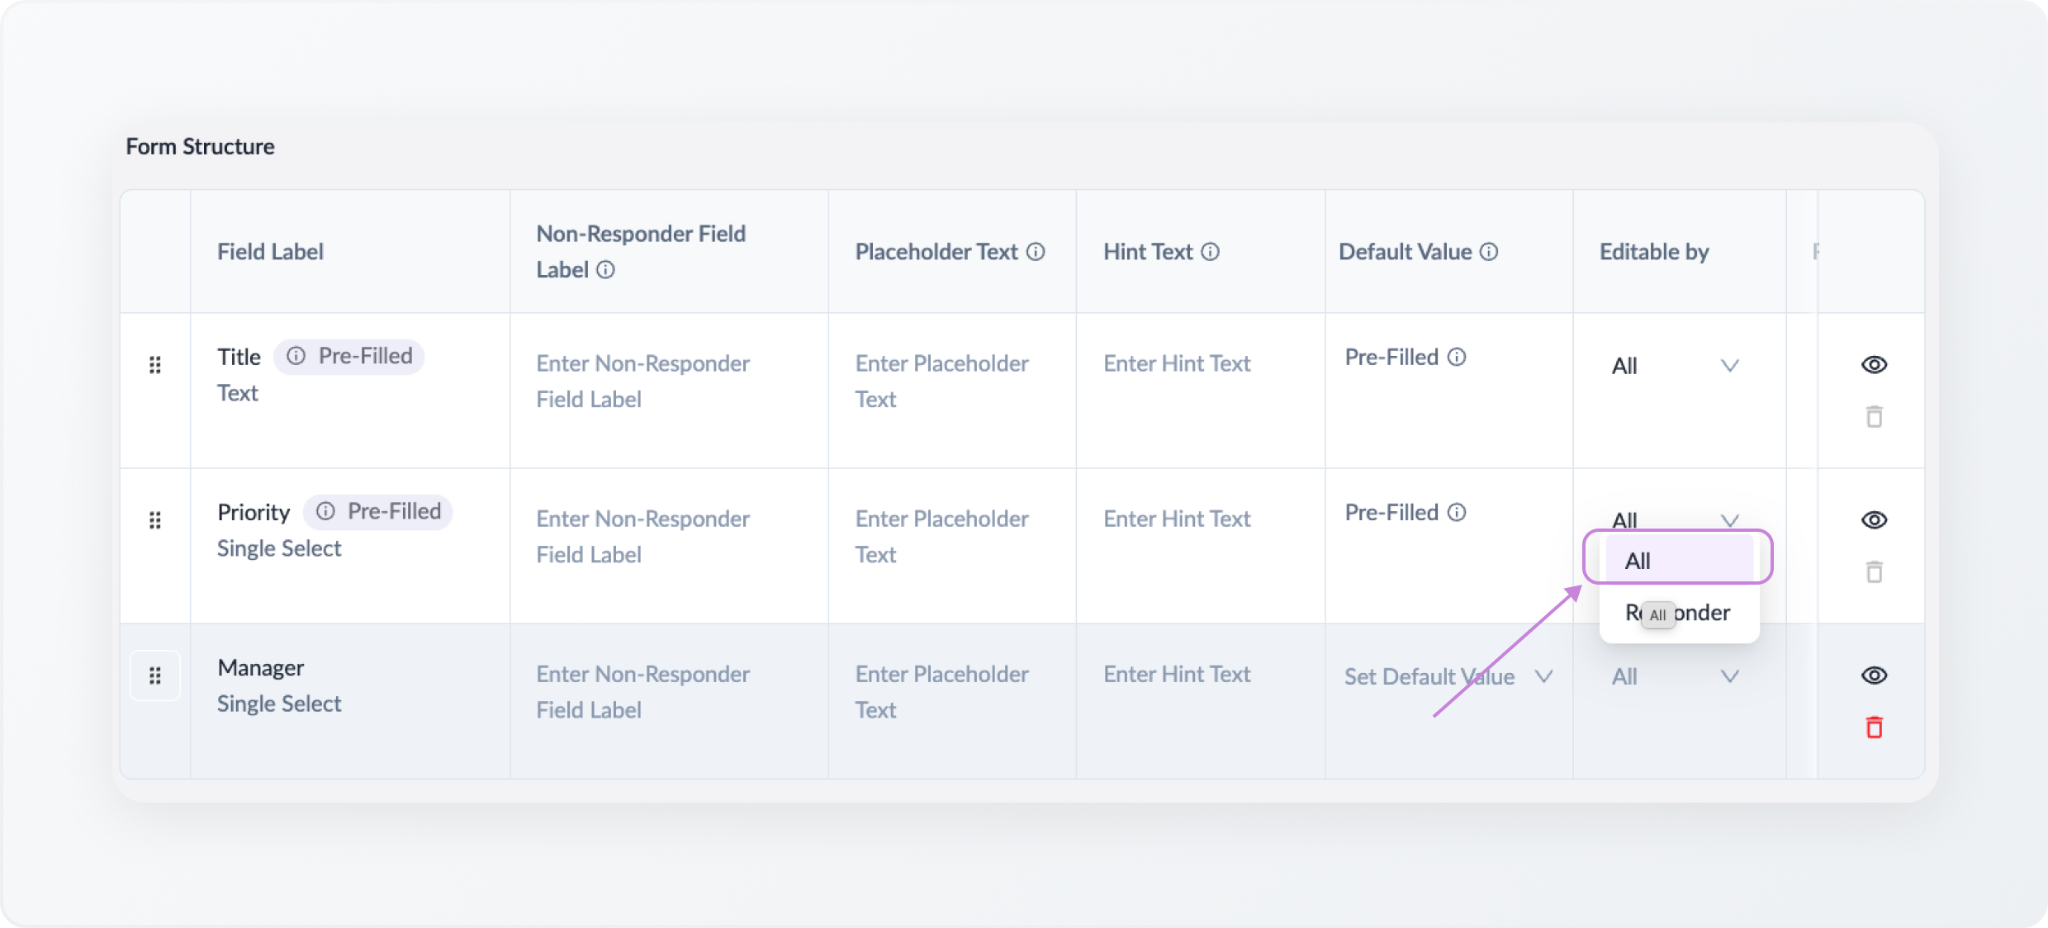
- Keep Editable by set to All, as required for dynamic approvers. Hide the field if requesters shouldn't select it.
- Go to Approval Workflows, select Approver type “Use Form Fields”, and choose from Select Form Field → Manager in the approval chain, and set a backup approver.
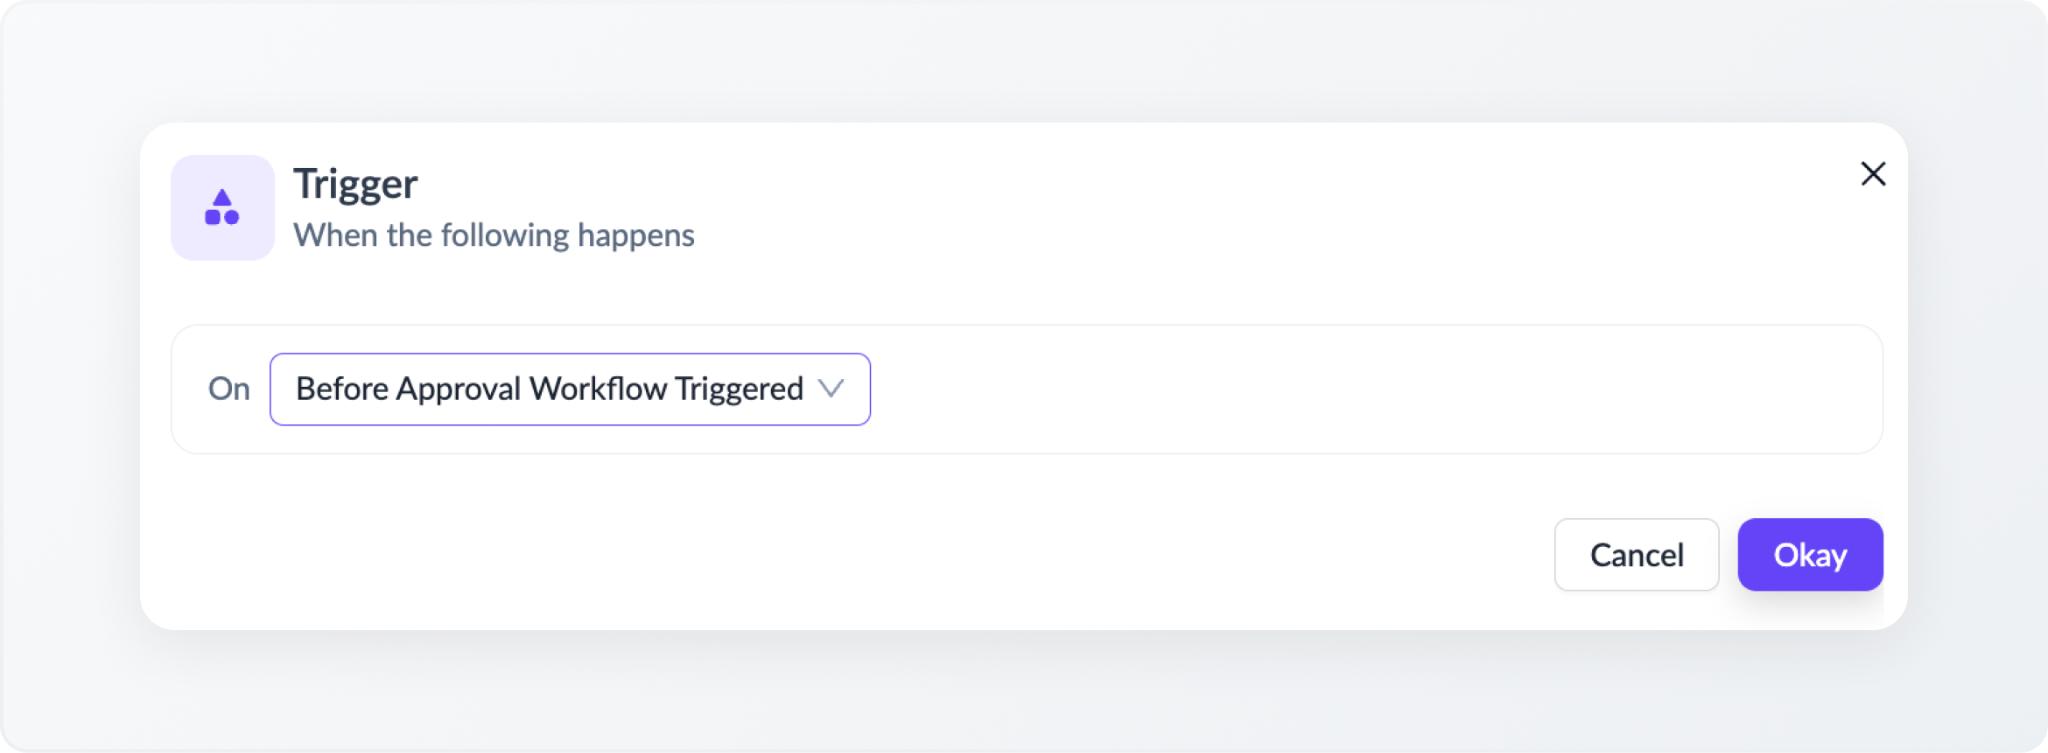
- Create an automation using the Before Approval Workflow Triggered.
- Add the Okta Get Manager Email* action, using the requester's email as input.
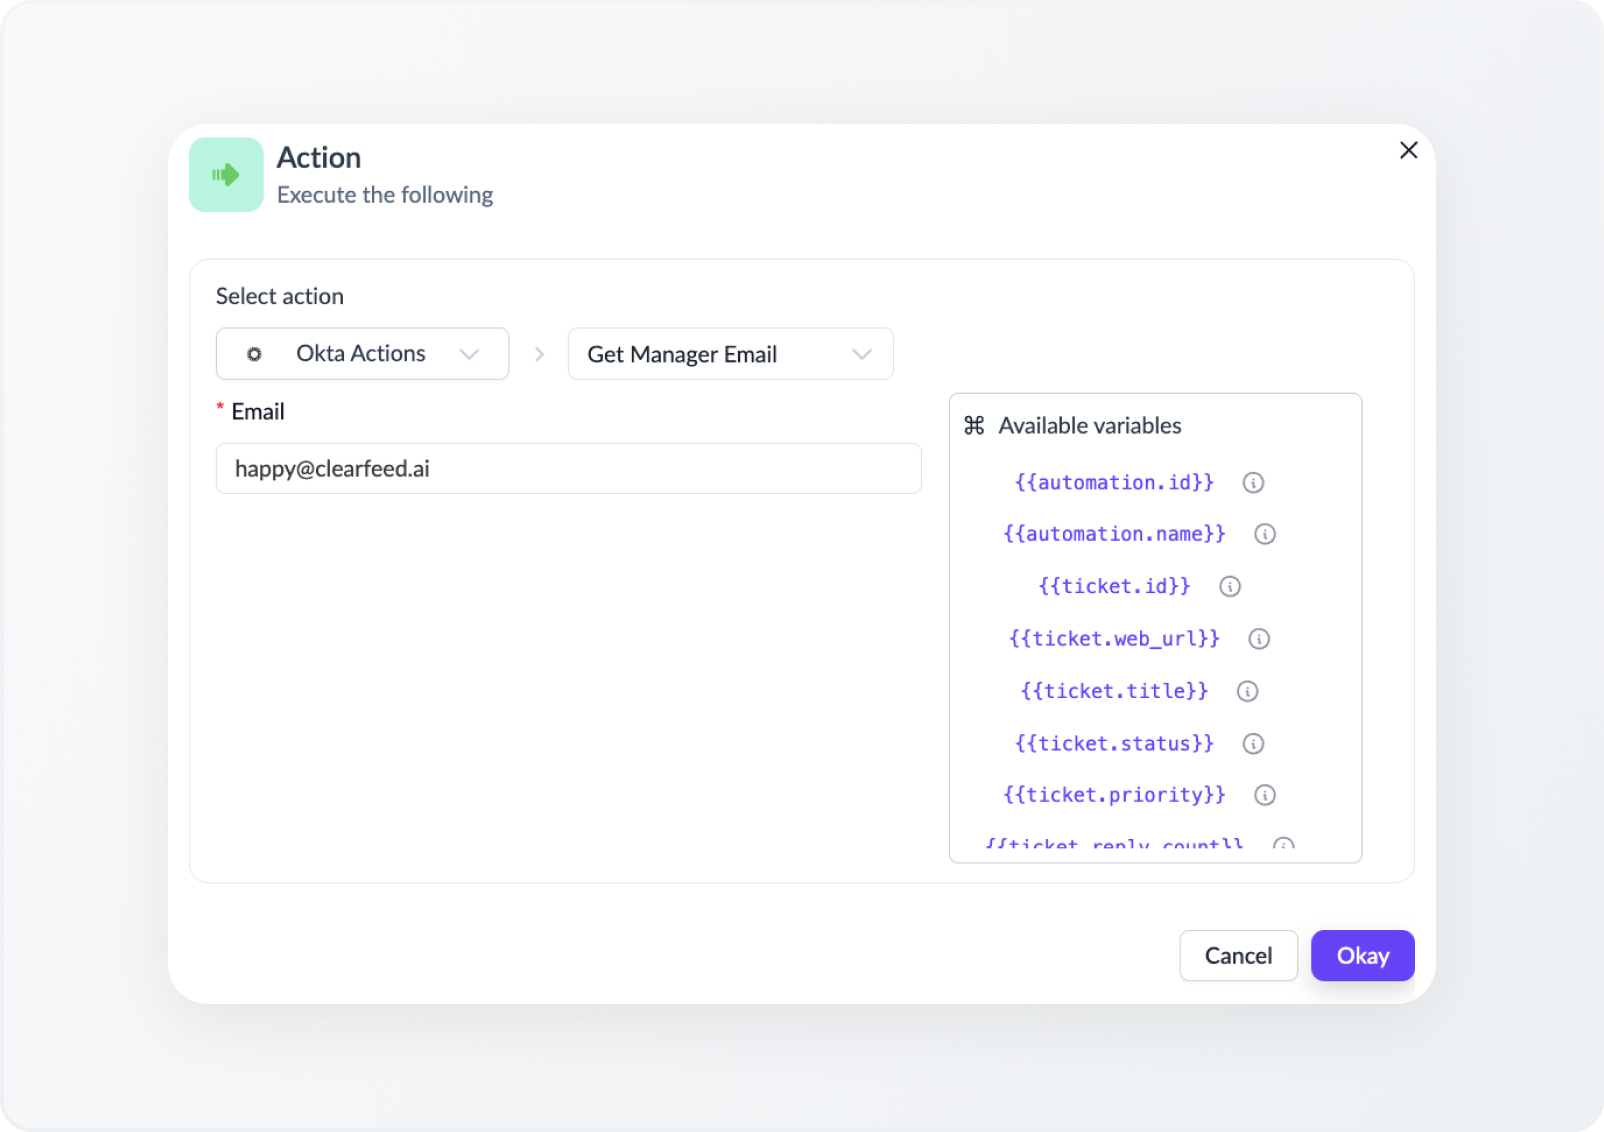
- Add Set Field to populate Manager from the Okta action's External Integration Output.
Get Manager Email is specific to Okta. For JumpCloud or other identity providers, populate the Manager field through an HR system or requester selection. Check with ClearFeed support whether Slack profile-based lookup is supported.
Ensure the automation completes before approvals begin and follow the recipe's default-value requirement for hidden fields. Test missing manager data to verify that the designated backup approver receives the request.
Step 7: Define What Happens After Approval or Rejection
Approvers receive a Slack DM from ClearFeed to approve or reject a request, with an optional comment. Approval advances the request to the next level, while rejection ends the approval process immediately.
To handle the outcome, create an automation using the Approval Workflow Completed trigger. Set conditions for the relevant workflow and an Approval Workflow Status of approved or rejected. See the automation trigger and condition reference.
For approved requests, choose a fulfillment method:
- Webhook: Send the approved request to a provisioning system to grant access.
- Identity provider action: Use a supported Okta or JumpCloud operation where available.
- Manual fulfillment: Assign the ticket to the IT owner responsible for granting access.
Check which actions your integration supports before automating fulfillment. ClearFeed's Okta integration supports group management through configured AI Agents, but these capabilities may differ from the operations available in automation actions. Similarly, JumpCloud AI Agents can manage system groups and user status, but their actions are not necessarily available as post-approval automation steps. Use a webhook or a manual task when direct automation is not supported.
Finally, notify the requester of the outcome. For approved requests, distinguish between approval granted and access provisioned. Rejected requests should receive a clear notification and must not trigger provisioning.
Step 8: Test the Complete Workflow
Submit test requests through both the specific and default routes. Test approvals at every level, rejection, missing approver data, and duplicate approvers.
Review Ticket Activity, the Approval Task view, and private comments in the Slack triage channel. Verify that the decision history captures the correct approvers, backup use, skip reasons, comments, and timestamps.
Test fulfillment separately using ClearFeed's Execution Logs. If an action fails, the workflow skips subsequent actions, but it does not roll back completed actions. Ensure IT can identify failed grants and retry safely without duplicating access.
Notify the requester that access is granted only after the provisioning system or IT owner confirms completion.
Start With One Access Approval Workflow
Pick a common request, agree on who must approve it, and connect the form to an approval chain. Be sure to test the fallback route and the fulfillment step before expanding to additional applications.
ClearFeed's Approval Workflows for Slack keep those decisions linked to the employee's ticket. Book a demo to walk through your approval policy and the systems you use to grant access.