Table of Contents
Imagine you are receiving Support requests over Slack. You have ClickUp set up, but people prefer to message you on Slack instead. Support requests are getting lost in Slack, and while Slack and ClickUp have a good integration - there is poor synchronization between the two - causing confusion, delays, and frustrated users.
What’s the solution? In this guide, we have compiled a brief series of steps on how to utilize ClickUp, Slack, and ClearFeed to set up a lightweight helpdesk within Slack.
TL;DR
ClearFeed bridges Slack and ClickUp so support requests don't get lost in chat — Slack messages become tracked ClickUp tasks with bidirectional sync, all without leaving Slack.
The gist
- Setup takes five steps: verify ClickUp workspace admin permissions, connect ClickUp to ClearFeed via Settings → Integrations, add Slack request channels to a ClearFeed Collection, configure an emoji trigger for task creation in the Collection's Task Management settings, and note the triage channel name.
- Two ways to create a ClickUp task: react to any Slack message with the configured emoji (auto-generates an AI summary and syncs the thread), or use More Actions → File a ClickUp task from the triage channel for more control over which messages to include, assignee, priority, and due date.
- Tasks can be marked as blockers so the support request stays open in ClearFeed until the linked ClickUp task is resolved.
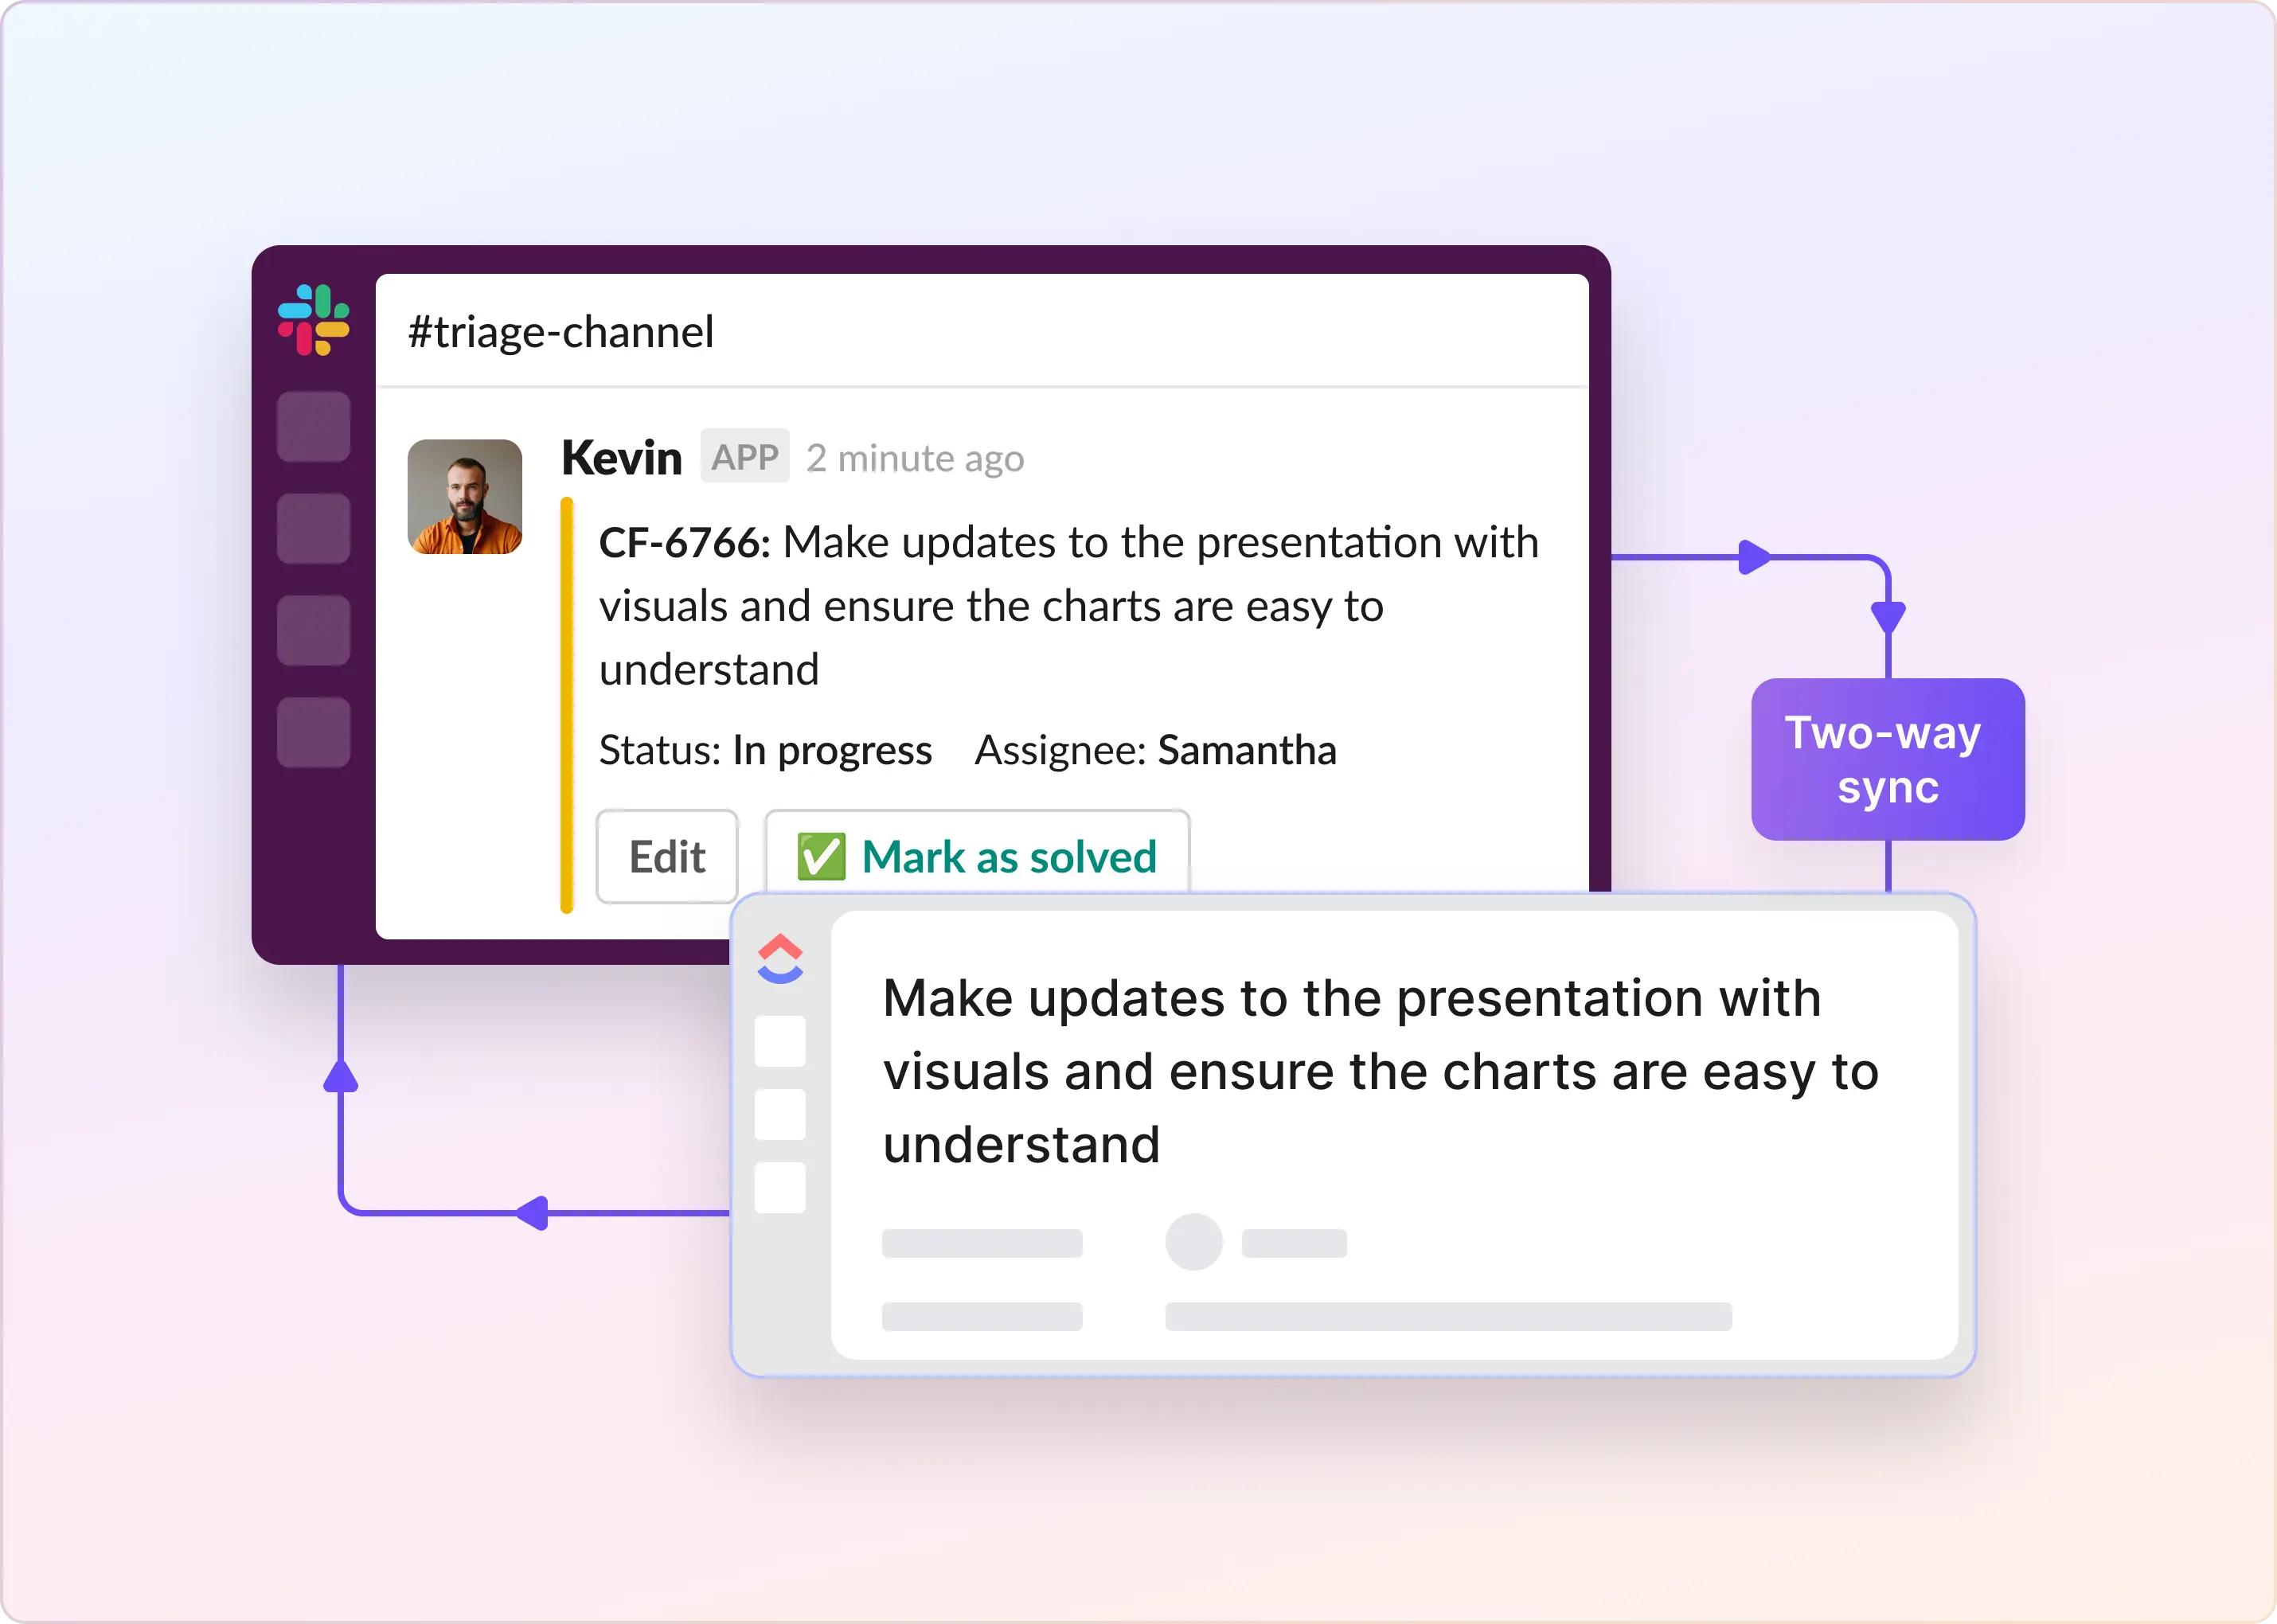
- Bidirectional sync means ClickUp status changes and comments flow back into the Slack thread automatically, and multiple ClearFeed tickets can be linked to a single ClickUp task.
- Beyond task creation, ClearFeed also supports SLAs, pending response alerts, AI query deflection, and multi-channel announcements on top of the same setup.
Solution Architecture
Here’s how we are going to be using Slack, ClickUp, and ClearFeed in this guide:
- Slack: The place where Support requests are filed - either in channels or via private messages to the ClearFeed Slack App.
- ClearFeed: A lightweight helpdesk that maintains a structured queue of every Support request raised on Slack - with statuses and assignees.
- ClickUp: A place to park important tasks linked to these Support requests - created or linked from these Support requests as needed.
ClearFeed provides bi-directional synchronization between Slack threads and the ClickUp tasks filed from them, replicating replies and comments in both directions, and also replicates status updates from ClickUp back into Slack threads.
Note: You can also use ClearFeed to log every Support ticket directly in Slack and into ClickUp.
Steps To Integrate ClickUp and Slack
This document assumes you have already signed up for ClearFeed. If not, head over to web.clearfeed.app and create a new account. Pick Internal or External Helpdesk as your use case (depending on whether you are working with internal users or customers on Slack), connect to Slack, and skip adding any integrations (just to make things simple).
Step #1: Check Your ClickUp Permissions
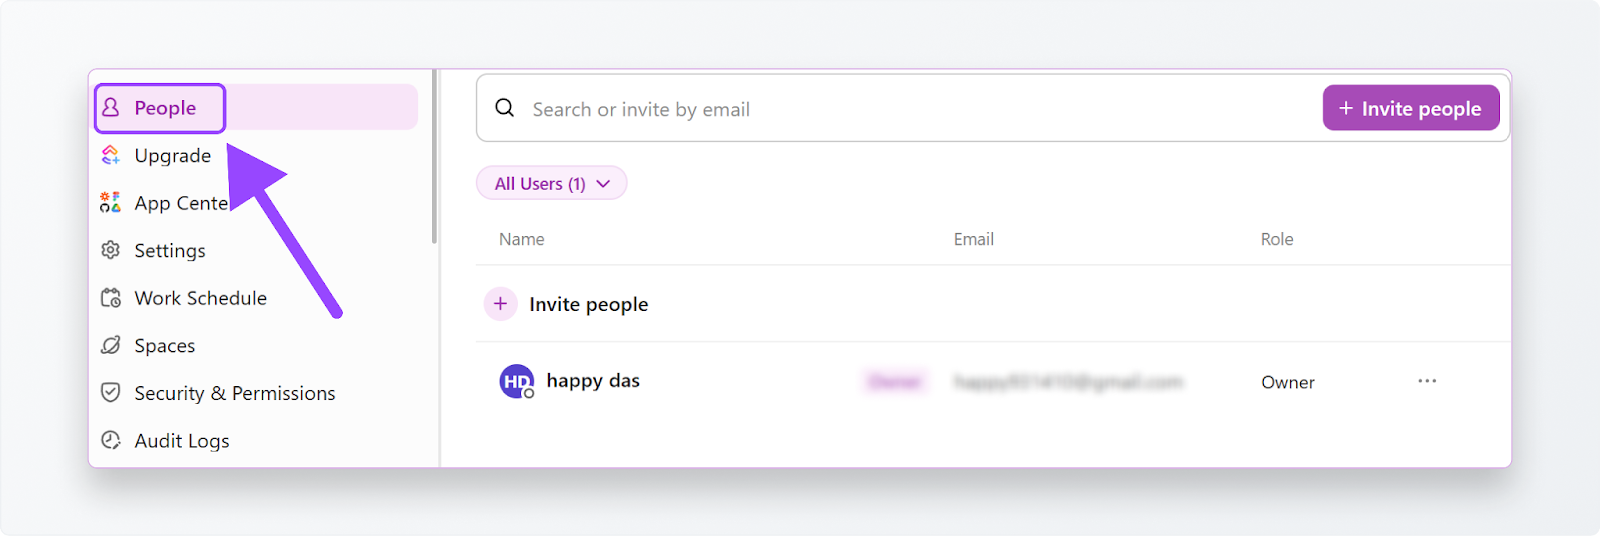
Before connecting anything, ensure you have the correct access in ClickUp. You’ll need to be a workspace admin or have integration rights. Here’s how to confirm:
- Open ClickUp and click your workspace avatar in the upper-left corner.
- Select Settings.
- Open the People tab to check your role.
Step #2: Connect ClickUp to ClearFeed
Now it’s time to bring ClearFeed and ClickUp together.
- If you haven’t already, sign up for ClearFeed (web.clearfeed.app).
- If you are signing up for the first time, simply select the Option to use ClearFeed as an Internal or External Helpdesk, as applicable. Skip connecting with ClickUp during setup.
- After signing up, head over to Settings > Integrations and select ClickUp from the available apps.
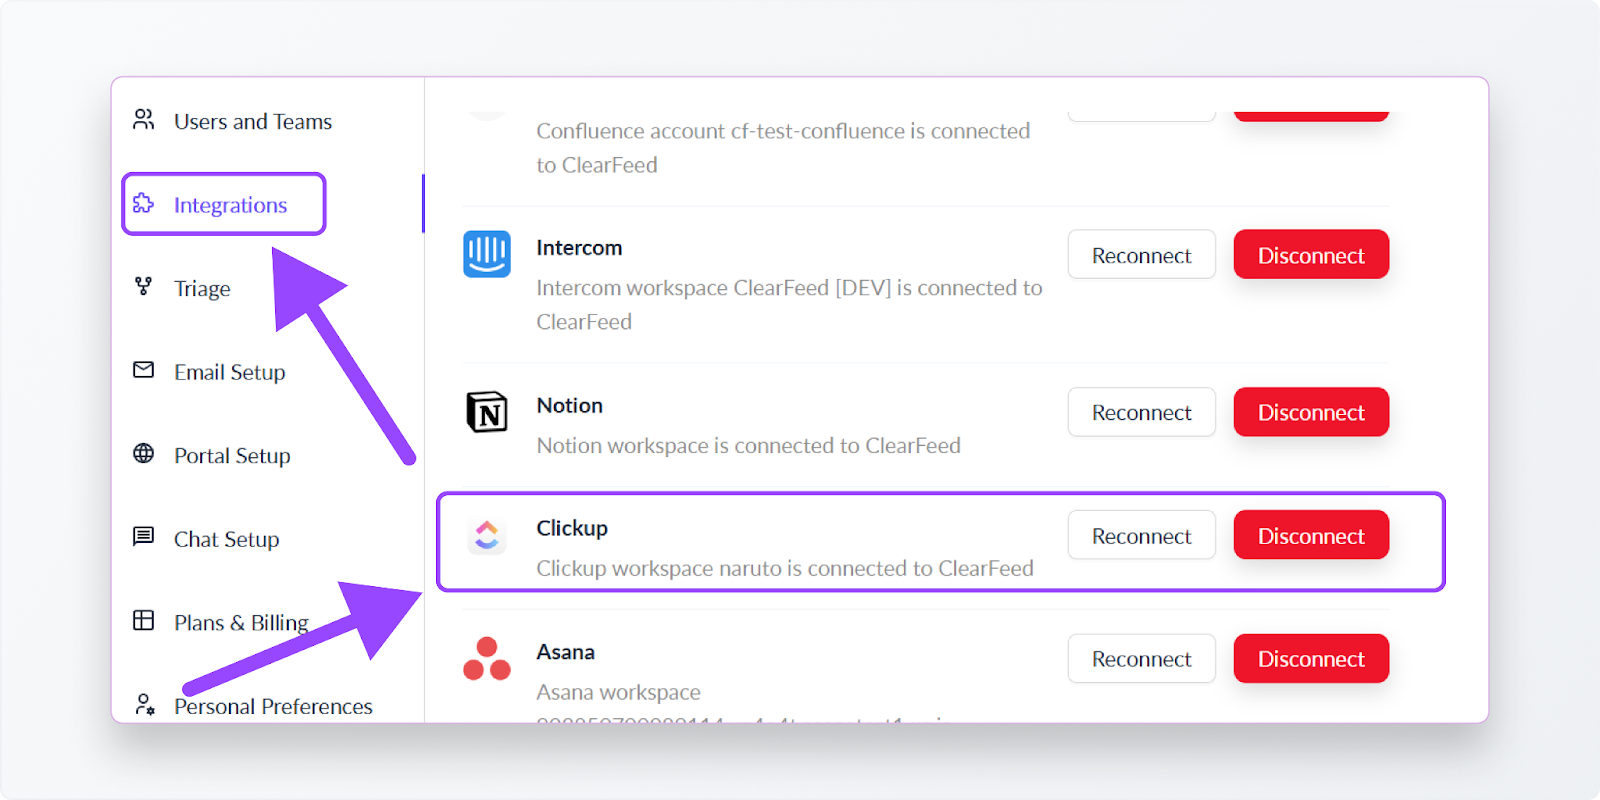
- Click + Connect a new account and sign in with your ClickUp credentials.
- Authorize ClearFeed to access your workspace and choose the Space/List where tasks should be created.
When you’re done, you’ll see ClearFeed listed under your ClickUp integrations.
Step #3: Add Slack “Request” Channels to ClearFeed
Think of this as telling ClearFeed, “Here’s where Support requests are logged.”
- Head to web.clearfeed.app/collections. This is where all your collections are managed. A Collection is ClearFeed’s way of grouping requests from a source (Slack channel, email, web chat, API, etc.).
- In the left-hand navigation panel, you’ll see a list of collections. You may already have a Slack Channel Collection created as part of the automatic account setup.
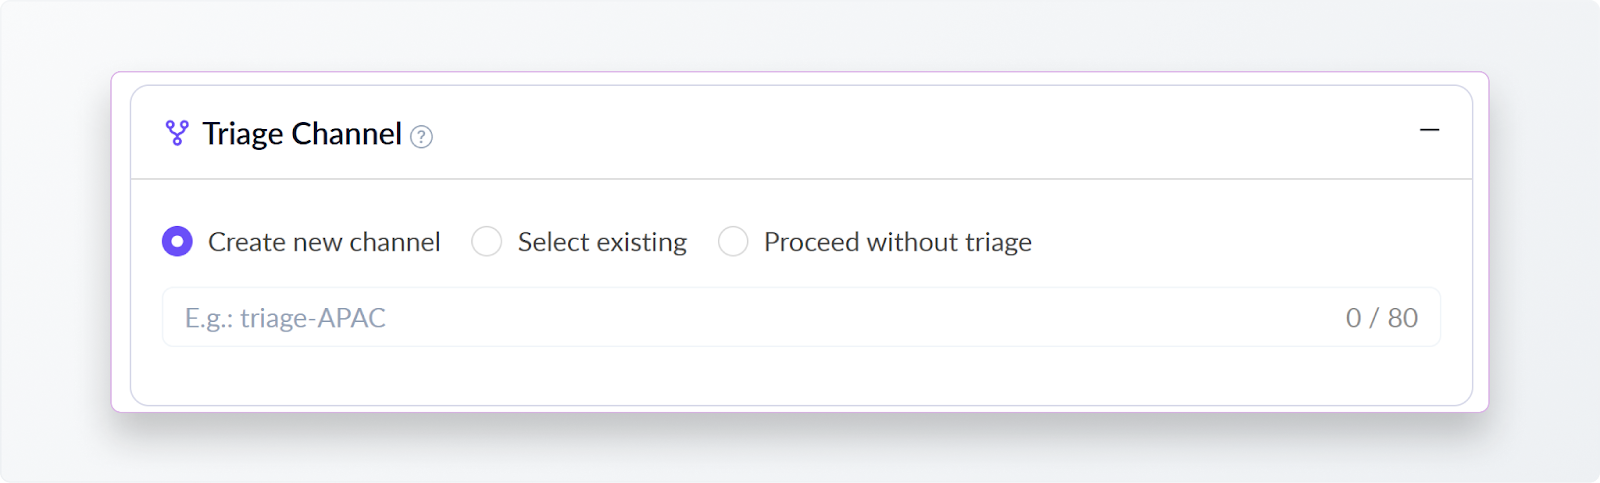
- If you don’t see an existing Slack Channel Collection - click New from the bottom left and pick Collection → Slack Collection. Give it a meaningful name (e.g., “Support Requests”), add a triage channel (let’s call it #cf-triage-channel), and create a Collection.
- Add some channels to the Collection from the previous step. Hover over the … menu next to the Collection name, and click on the New Channel option in the Dropdown. This will bring up a dialog like below, where you can add some Slack channels where Support requests are being logged.
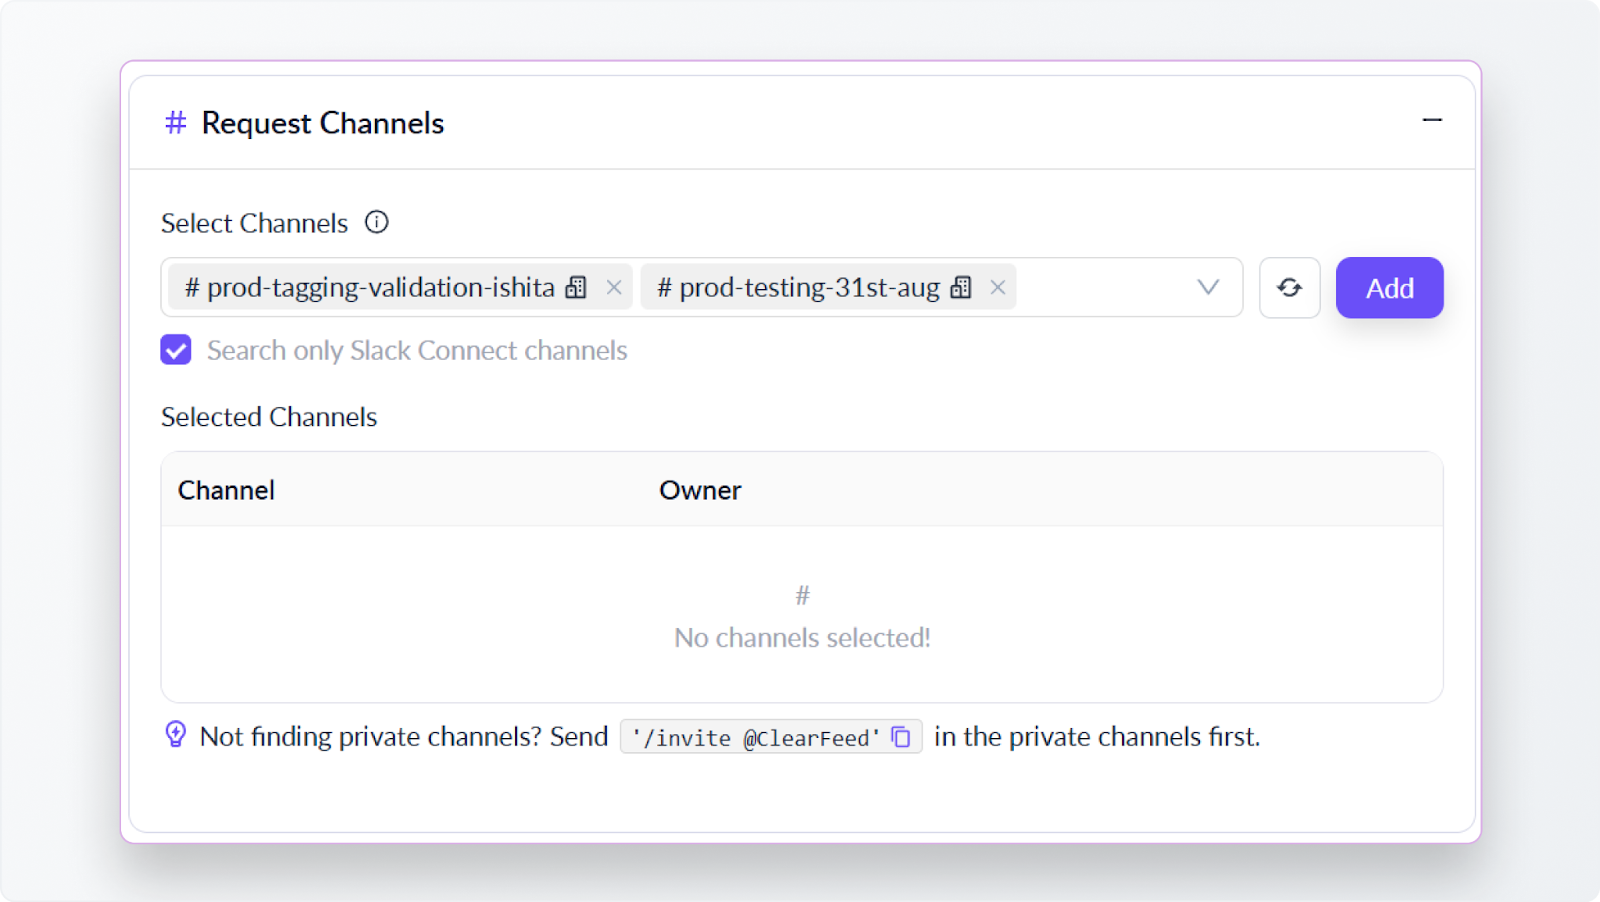
The triage channel is optional, but it’s recommended so that requests from multiple sources can be monitored in one place, providing you with more control and visibility.
Step #4: Configure ClickUp Task creation using Emojis
We will not configure ClearFeed to create ClickUp tasks when an emoji is applied to the request channels. To do this, go to your Collection on the ClearFeed Web App, click on Settings on the top right:
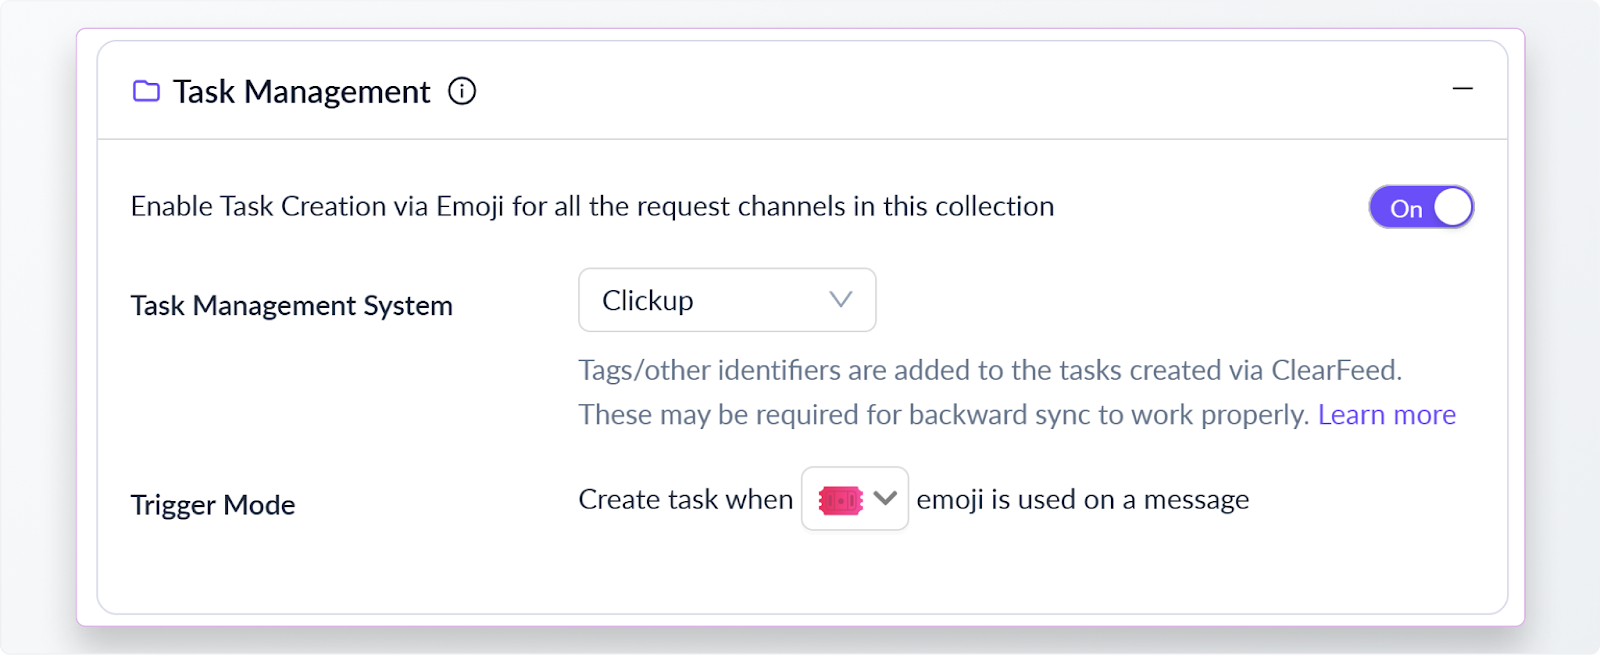
- Scroll down to Task Management in your Collection settings, enable Task Creation, and select ClickUp.
- Pick an emoji (🎟️ is popular) that teammates can use to convert Slack messages into tasks.
Step #5: Note down the name of the Triage Channel
We are nearly done! As part of the Account or Collection Setup, we would have created a Triage Channel (something like #cf-triage-channel). You can find it in the Collection Settings in the Triage Channel section. Make a Note of it.
Now, Create a ClickUp Task From a Slack Message
ClearFeed now tracks any message posted in the Slack Request Channels, as well as in the Triage Channel, from which you can reply to the request, make private comments, and update the status of the Request. To create ClickUp tasks, we have two simple options:
1. From the Triage Channel
If you’re already working inside your Triage Channel, you can escalate a request directly to ClickUp:
- Open the request you want to track.
- Click on More Actions → File a Clickup task.
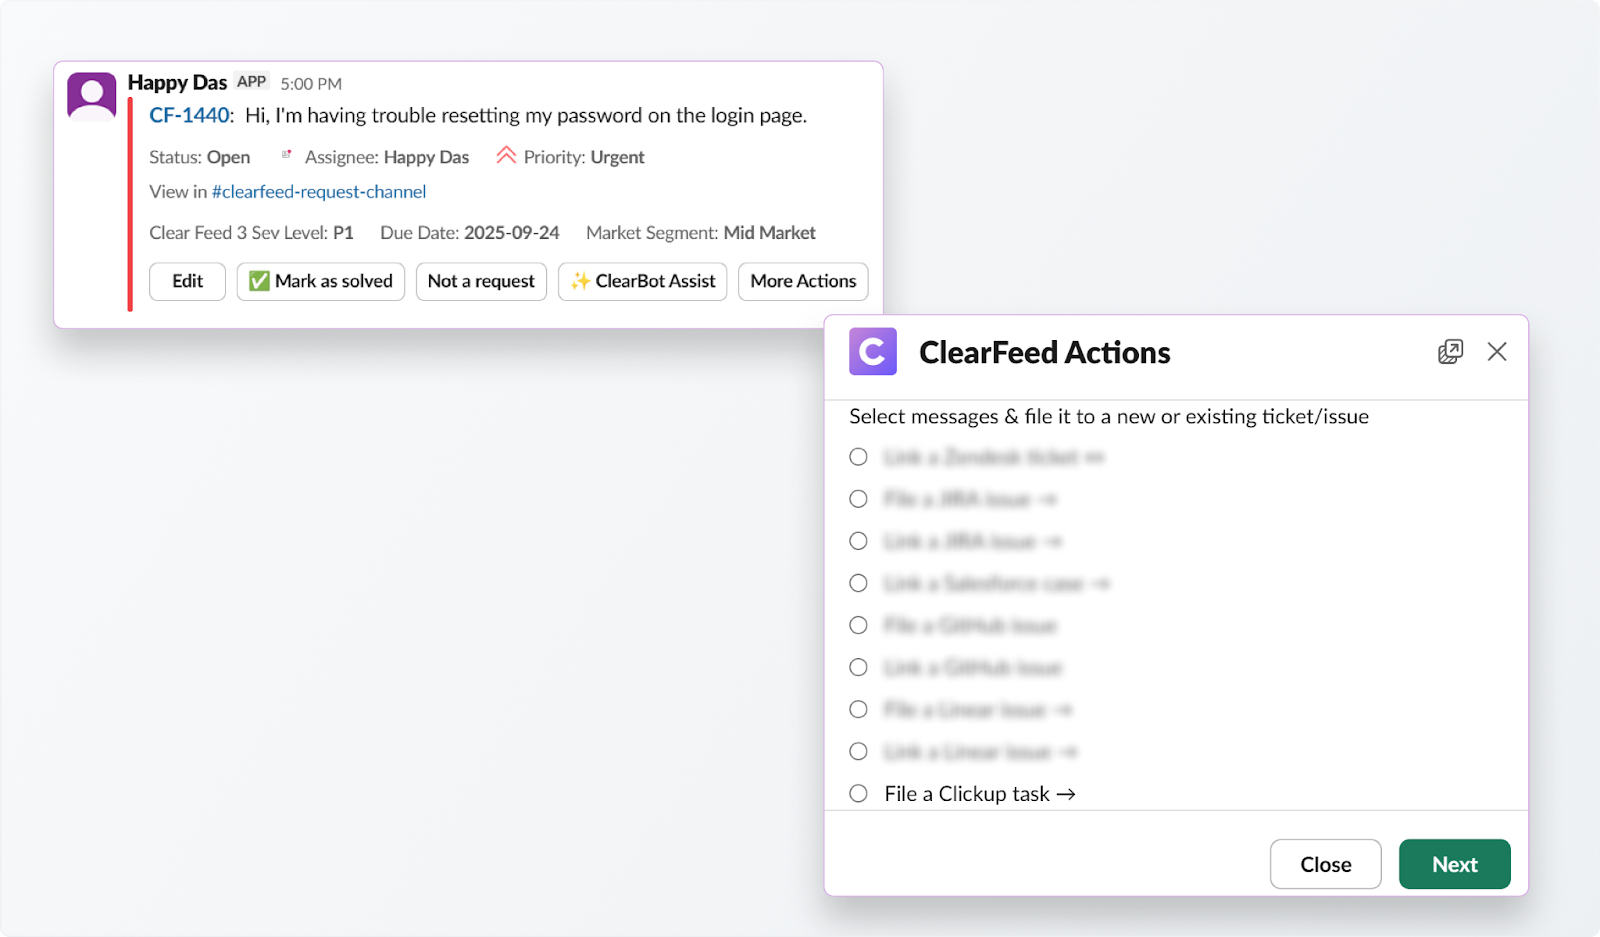
- Choose which messages from the thread to include and click Next. Fill out the task details (such as assignee, priority, or due date).
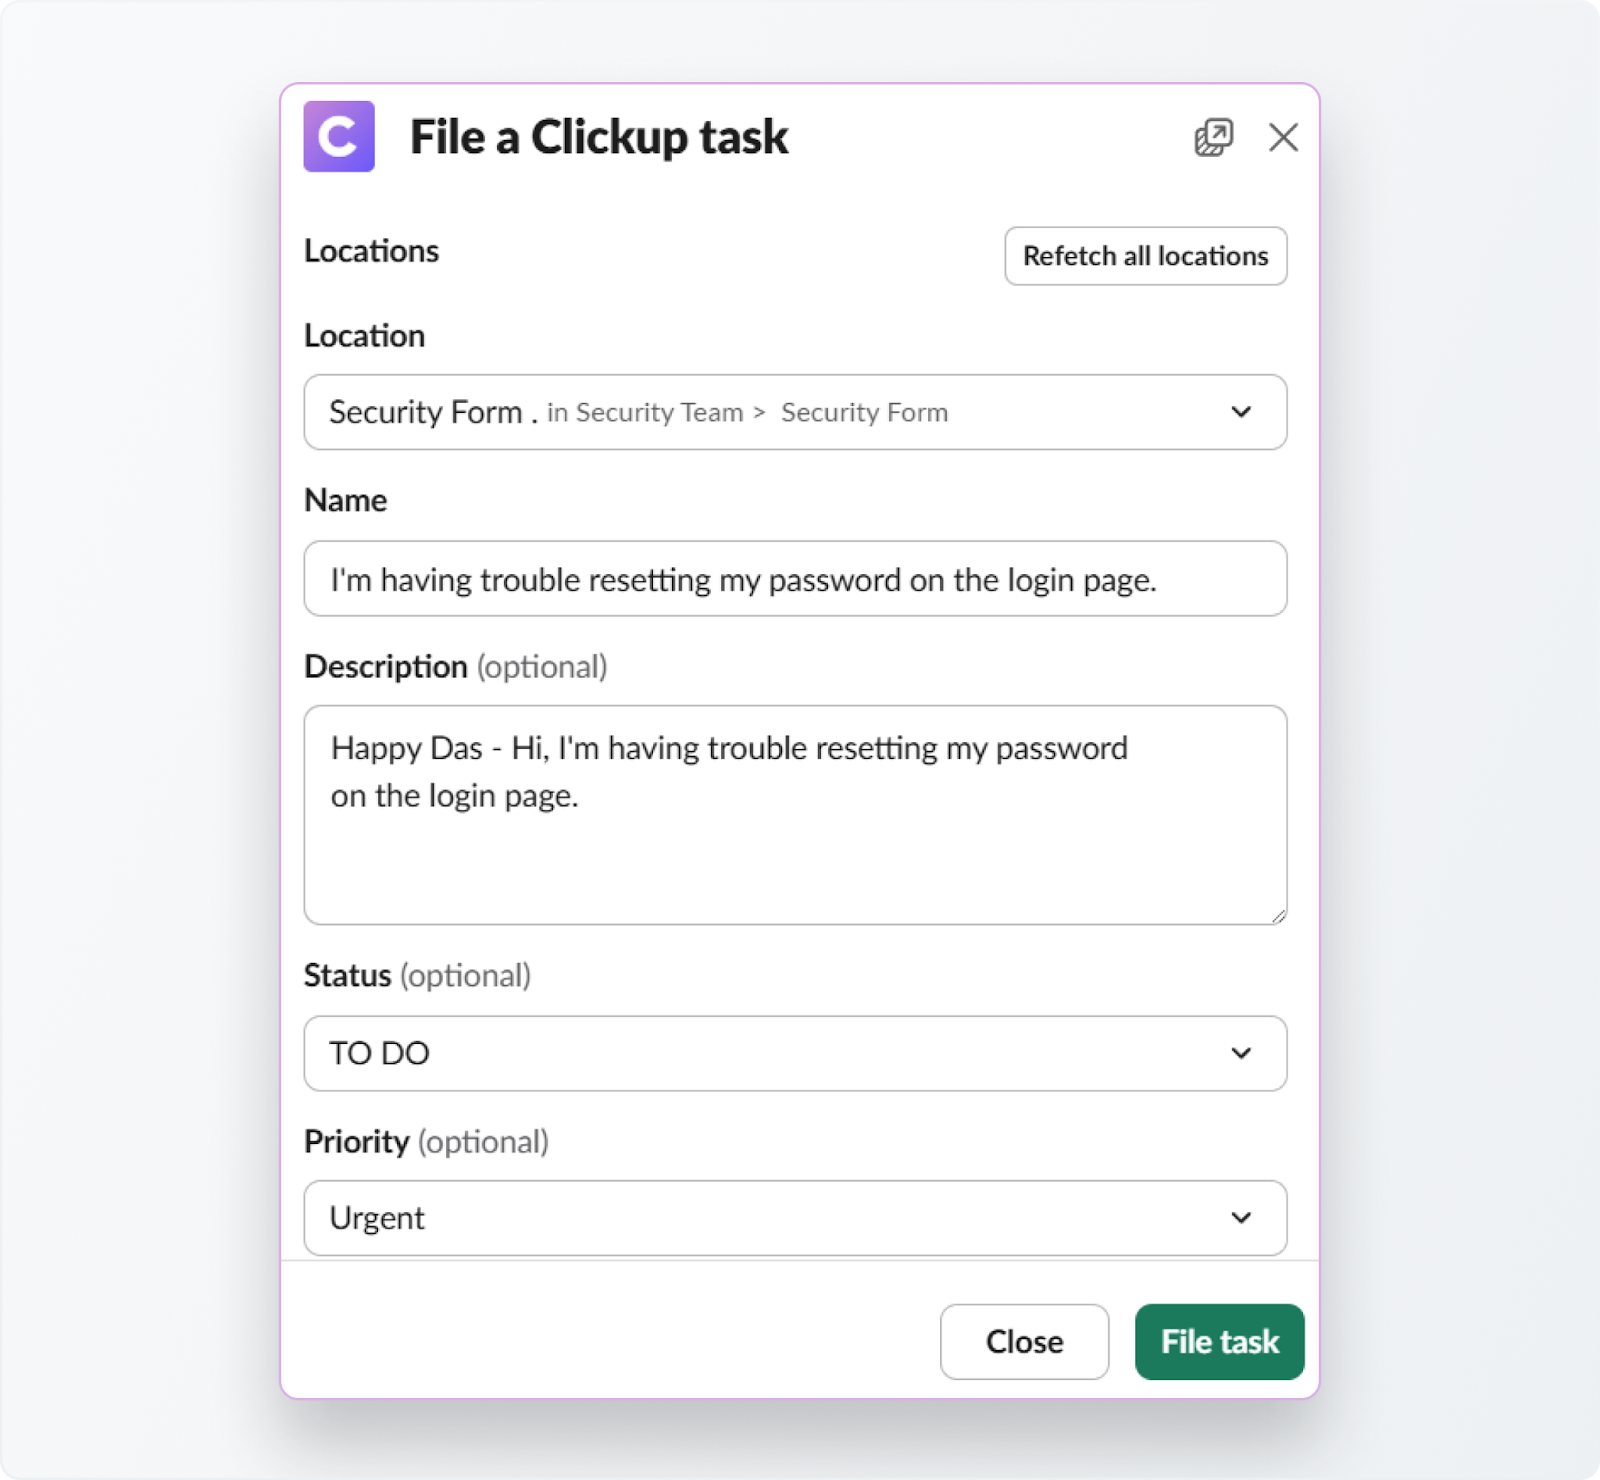
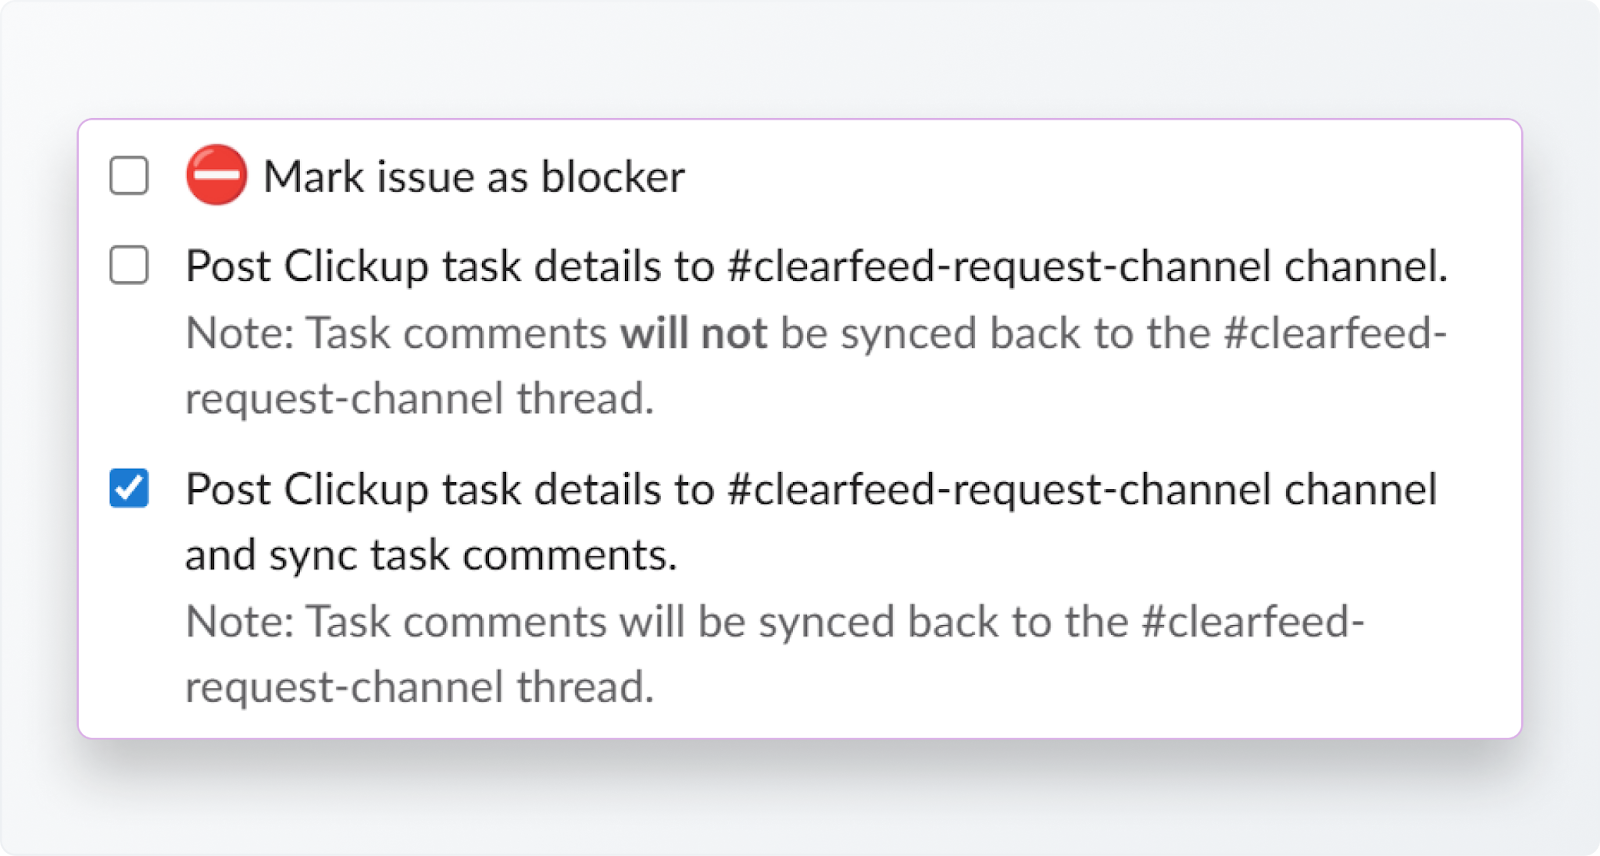
- (Optional) Mark the task as a blocker if you don’t want the support request to close until the ClickUp task is resolved.
- Decide whether to post the task details to the request channel, and if you’d like, future comments synced back.
- Click the File task, and the task is created instantly in ClickUp.
This method works well when your team is reviewing multiple requests at once and needs to escalate them during triage. You can also link multiple tickets in ClearFeed to the same task in ClickUp from the Triage channel.
2. Directly From the Request Channel
Sometimes you don’t need to jump into the triage view at all. You can file a task straight from the Slack request thread itself:
- Go to the message you want to track in Slack.
- Apply the Emoji that was configured as part of the Task Management Configuration in Step #3 above.
- This will automatically create a ClickUp Task with an AI-generated Summary from the Slack thread - and sync the Slack thread with the ClickUp Task.
More Ways of Combining the Power of Slack and ClickUp With ClearFeed
ClearFeed is a powerful platform for creating Slack-based helpdesks. There are many more things than we can cover in this brief guide, but here’s a quick preview:
- Configure SLAs: Set up SLAs for your support channels and receive SLA breach reports and flags for each support request.
- Tune Pending Response Alerts: ClearFeed classifies each message posted in Slack channels and posts alerts when Service teams are due for a response. Default alerts are created by default in Collection > Workflows and can be modified within this section.
- Deflect Queries Using AI Agents: You can add knowledge sources like Notion, Google Drive, websites, Wikis, knowledge bases, and more to ClearFeed and automatically answer and resolve questions in Slack before raising tickets.
- Send Announcements: Have dozens of customer Slack channels? ClearFeed can send an announcement across all of them in one shot, schedule and modify it, and capture reactions and replies.
- Use ClickUp as a Ticketing System: This guide demonstrates how to track support tickets in ClearFeed while filing tasks in ClickUp. You can also configure ClickUp as a ticketing system directly, so the entries in the triage channel accurately reflect ClickUp tasks, their statuses, and assignees.
Power Up Slack and ClickUp Support With ClearFeed
ClearFeed connects Slack and ClickUp, so no request gets lost. It converts conversations into ClickUp tasks, organizes them into collections, and utilizes forms to maintain consistency. With bidirectional sync, updates flow both ways—so changes in ClickUp are reflected instantly in Slack, and Slack conversations stay linked to their corresponding tasks.
Your team can manage support requests without ever leaving Slack. That means quicker replies, smoother teamwork, and happier customers. Get started with a free trial today and see it in action!