Table of Contents
Customer service can feel like a complex puzzle, but tools like Zendesk make it much simpler for businesses to support their customers effectively. At the heart of awesome customer service is good, clear talking – and that’s exactly where Zendesk forms come in handy.
These forms let your customers easily get in touch, and they're a super important way for you to learn what your customers need. This can significantly improve your business. If you're new to Zendesk forms or looking to enhance your use of them, you're in the right place. Step by step, we’ll show you how to get started with Zendesk forms.
TL;DR
Zendesk forms help teams collect structured ticket information upfront, but Slack-based form workflows need ClearFeed or Zapier because Zendesk’s native Slack app does not support it.
The gist
- Zendesk forms reduce back-and-forth by collecting required fields, issue context, and relevant customer details at intake.
- Admins create forms from Admin Center > Objects and rules > Tickets > Forms.
- Customers can submit tickets through Help Center forms, custom API forms, web widgets, or third-party integrations.
- Zendesk limits accounts to 300 ticket forms, and advanced form features require higher-tier plans.
- ClearFeed can import Zendesk forms into Slack, create Zendesk tickets from Slack forms, sync conversations, and manage tickets inside Slack.
Worth knowing: Zendesk pricing can climb as teams grow because it is agent-based; ClearFeed is a lower-cost Slack-Zendesk layer with ticket-based pricing.
What Are the Benefits of Using Zendesk Forms?
Using Zendesk forms to manage customer service and support streamlines processes and improves customer satisfaction. Here are some main perks:
- Clear and Complete Communication: By asking the right questions from the start, support teams can quickly identify the root cause and develop a better solution. This reduces the need to go back and forth, saving time and keeping things running smoothly. Zendesk forms have mandatory fields, ensuring all important information is collected upfront and preventing the need to ask follow-up questions later, which can be frustrating for customers and delay problem resolution.
- Effortless Info Gathering: Customizable forms enable you to create dynamic fields that update or appear based on customer responses, so you can collect the most relevant information for each issue, cutting through the clutter and reducing the need for follow-up questions. Providing a structured and targeted information-sharing process helps customers feel more in control of the support process, leading to increased satisfaction and loyalty.
- Seamless Support Ticketing: Zendesk’s ecosystem integrates with a wide range of third-party applications and systems, enhancing form functionality and enabling action on collected data. Through these integrations, form data can trigger specific workflows, streamlining processes across customer service, sales, and marketing teams.
- Easier Access in One Hub: With forms integrated into the Help Center, customers can quickly move from self-service to support without leaving the page. This setup ensures that when customers do reach out, they provide all the needed details for a quick fix, improving their overall experience.
- Sharper Insights for Better Service: Zendesk forms help capture crucial data to analyze team performance, such as how quickly problems are solved and how happy customers are with the help. This info helps businesses identify where they need more resources, whether in training or tech, ensuring money is spent where it can make the greatest difference in customer satisfaction.
How To Create a Ticket Form in Zendesk?
To create a ticket form in Zendesk, follow these steps:
- Log in to your Zendesk account. Go to the “Admin center”.
- Click on “Objects and rules” in the sidebar. Select “Tickets” > “Forms”.
- To create a ticket form in Zendesk, you can select “Add ticket form”.
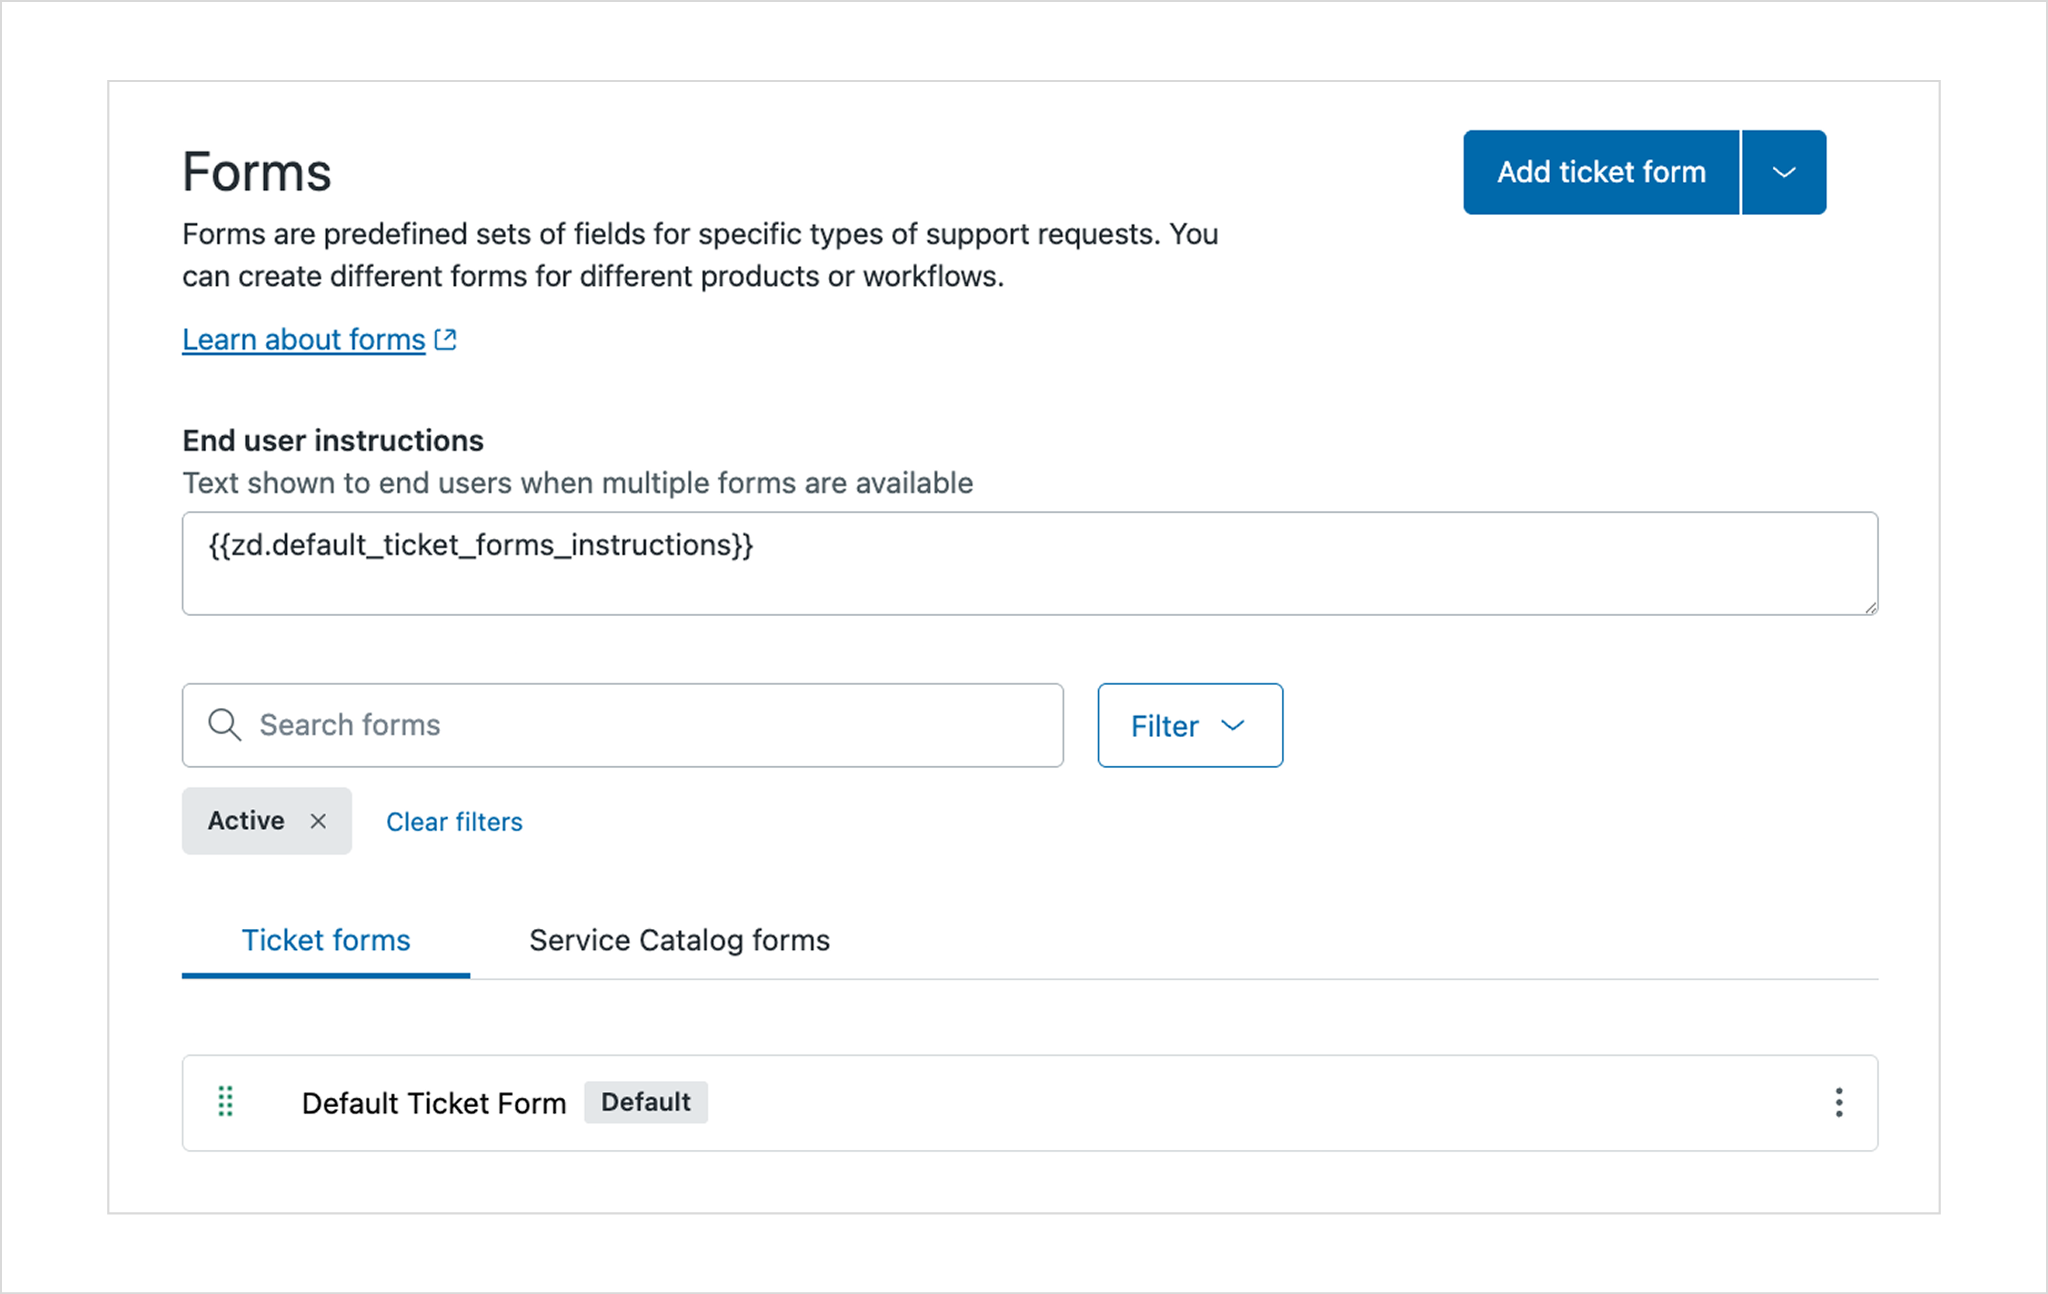
- Enter a name for your form.
- Customize the form by adding custom ticket fields. You can create multiple forms and use conditional ticket fields to tailor the form to specific support requests.
How To Edit a Ticket Form in Zendesk?
Here's how you can edit a ticket form in Zendesk in simple steps:
- Go to the “Admin Center” and then find "Objects and rules" in the menu on the left side. Click it, then select "Tickets," followed by "Forms".
- From the list that appears, select the ticket form you want to change and click it to open.
- Once the form is open, here's what you can do:
- Change the form's name and what it's for
- Add new fields for info, take some out, or move them around
- Decide if you want agents, customers, or both to be able to see the form
- Turn the form on so people can use it, or off if you don't need it right now
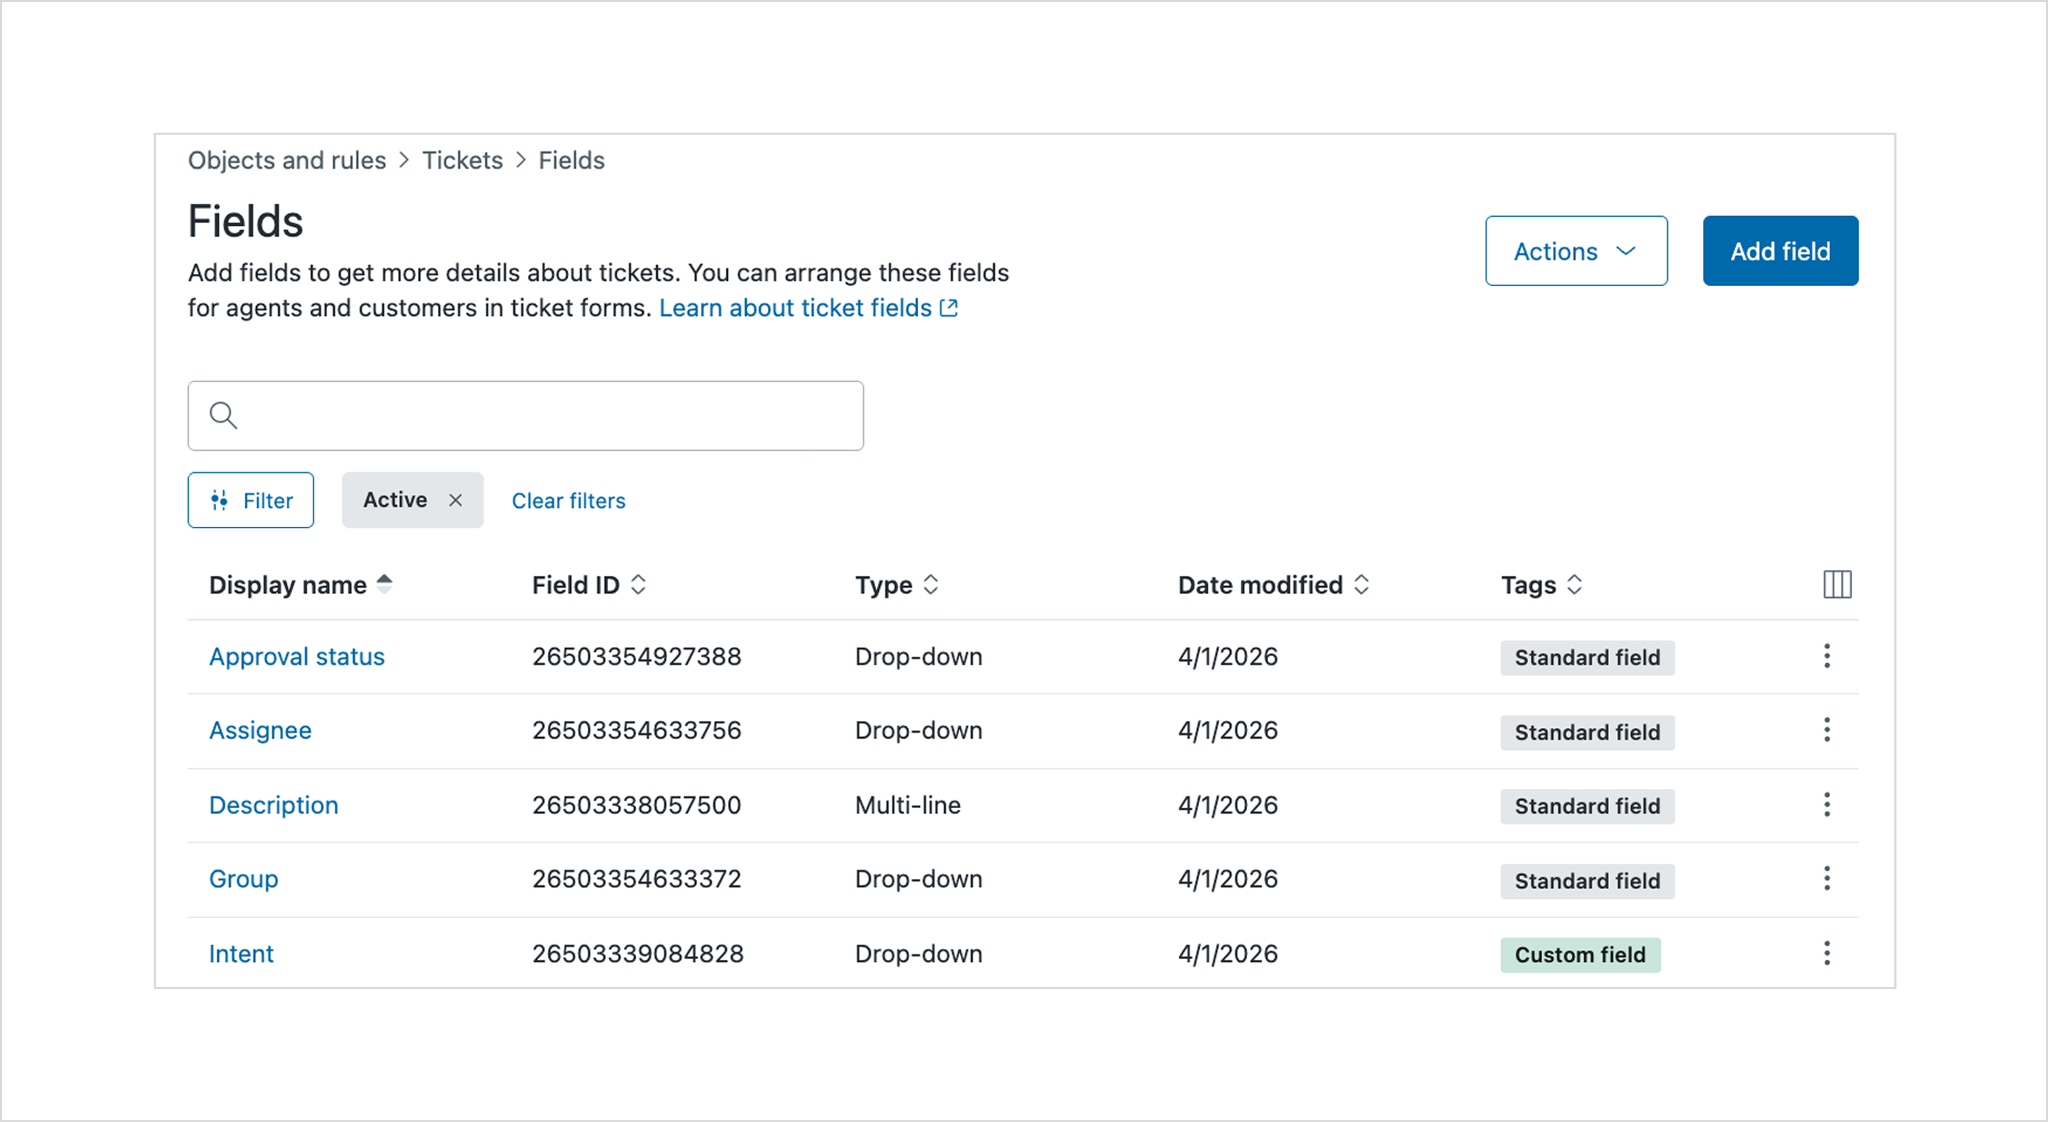
- If you need to update the bits of information (fields) that people fill in on the form, again go to "Objects and rules", then "Tickets", and choose "Fields". Move your mouse over the field that needs updating, click the menu that appears, then select "Edit". You'll be able to change things like the name of the field, what it's for, who can see it, and the choices available in it.
- Don't forget to click "Save" once you're happy with the changes you've made to the form or individual fields – that way, everything updates and is ready for use.
How Do Customers File Tickets Using Zendesk Forms?
Zendesk offers several ways for customers to submit support tickets. Here's a breakdown of the main options:
- Default Help Center Form: Zendesk provides a basic HTML form builder in its Help Center. Customers can easily fill this out with their name, email, and problem description. It's a simple, ready-to-use option that creates a ticket in your Zendesk system.
- Custom Ticket Forms: For more flexibility, you can create your own forms:
- Using the Zendesk API: If you have in-house tech support, you can build custom HTML forms on your own servers. These forms can send requests directly to Zendesk via the Zendesk Ticketing API, allowing you to add specific fields and features that suit your needs.
- Web Widgets: Zendesk offers widgets you can add to any webpage. These provide a customizable ticket form that customers can use without leaving your website. It's great for keeping users engaged on your site.
- Third-Party Integrations: Some businesses use third-party tools, such as ClearFeed, to enhance their ticketing process. These tools can create structured forms that streamline ticket submission and ensure you collect all the information you need from customers.
How To Create Zendesk Tickets in Slack Using Forms?
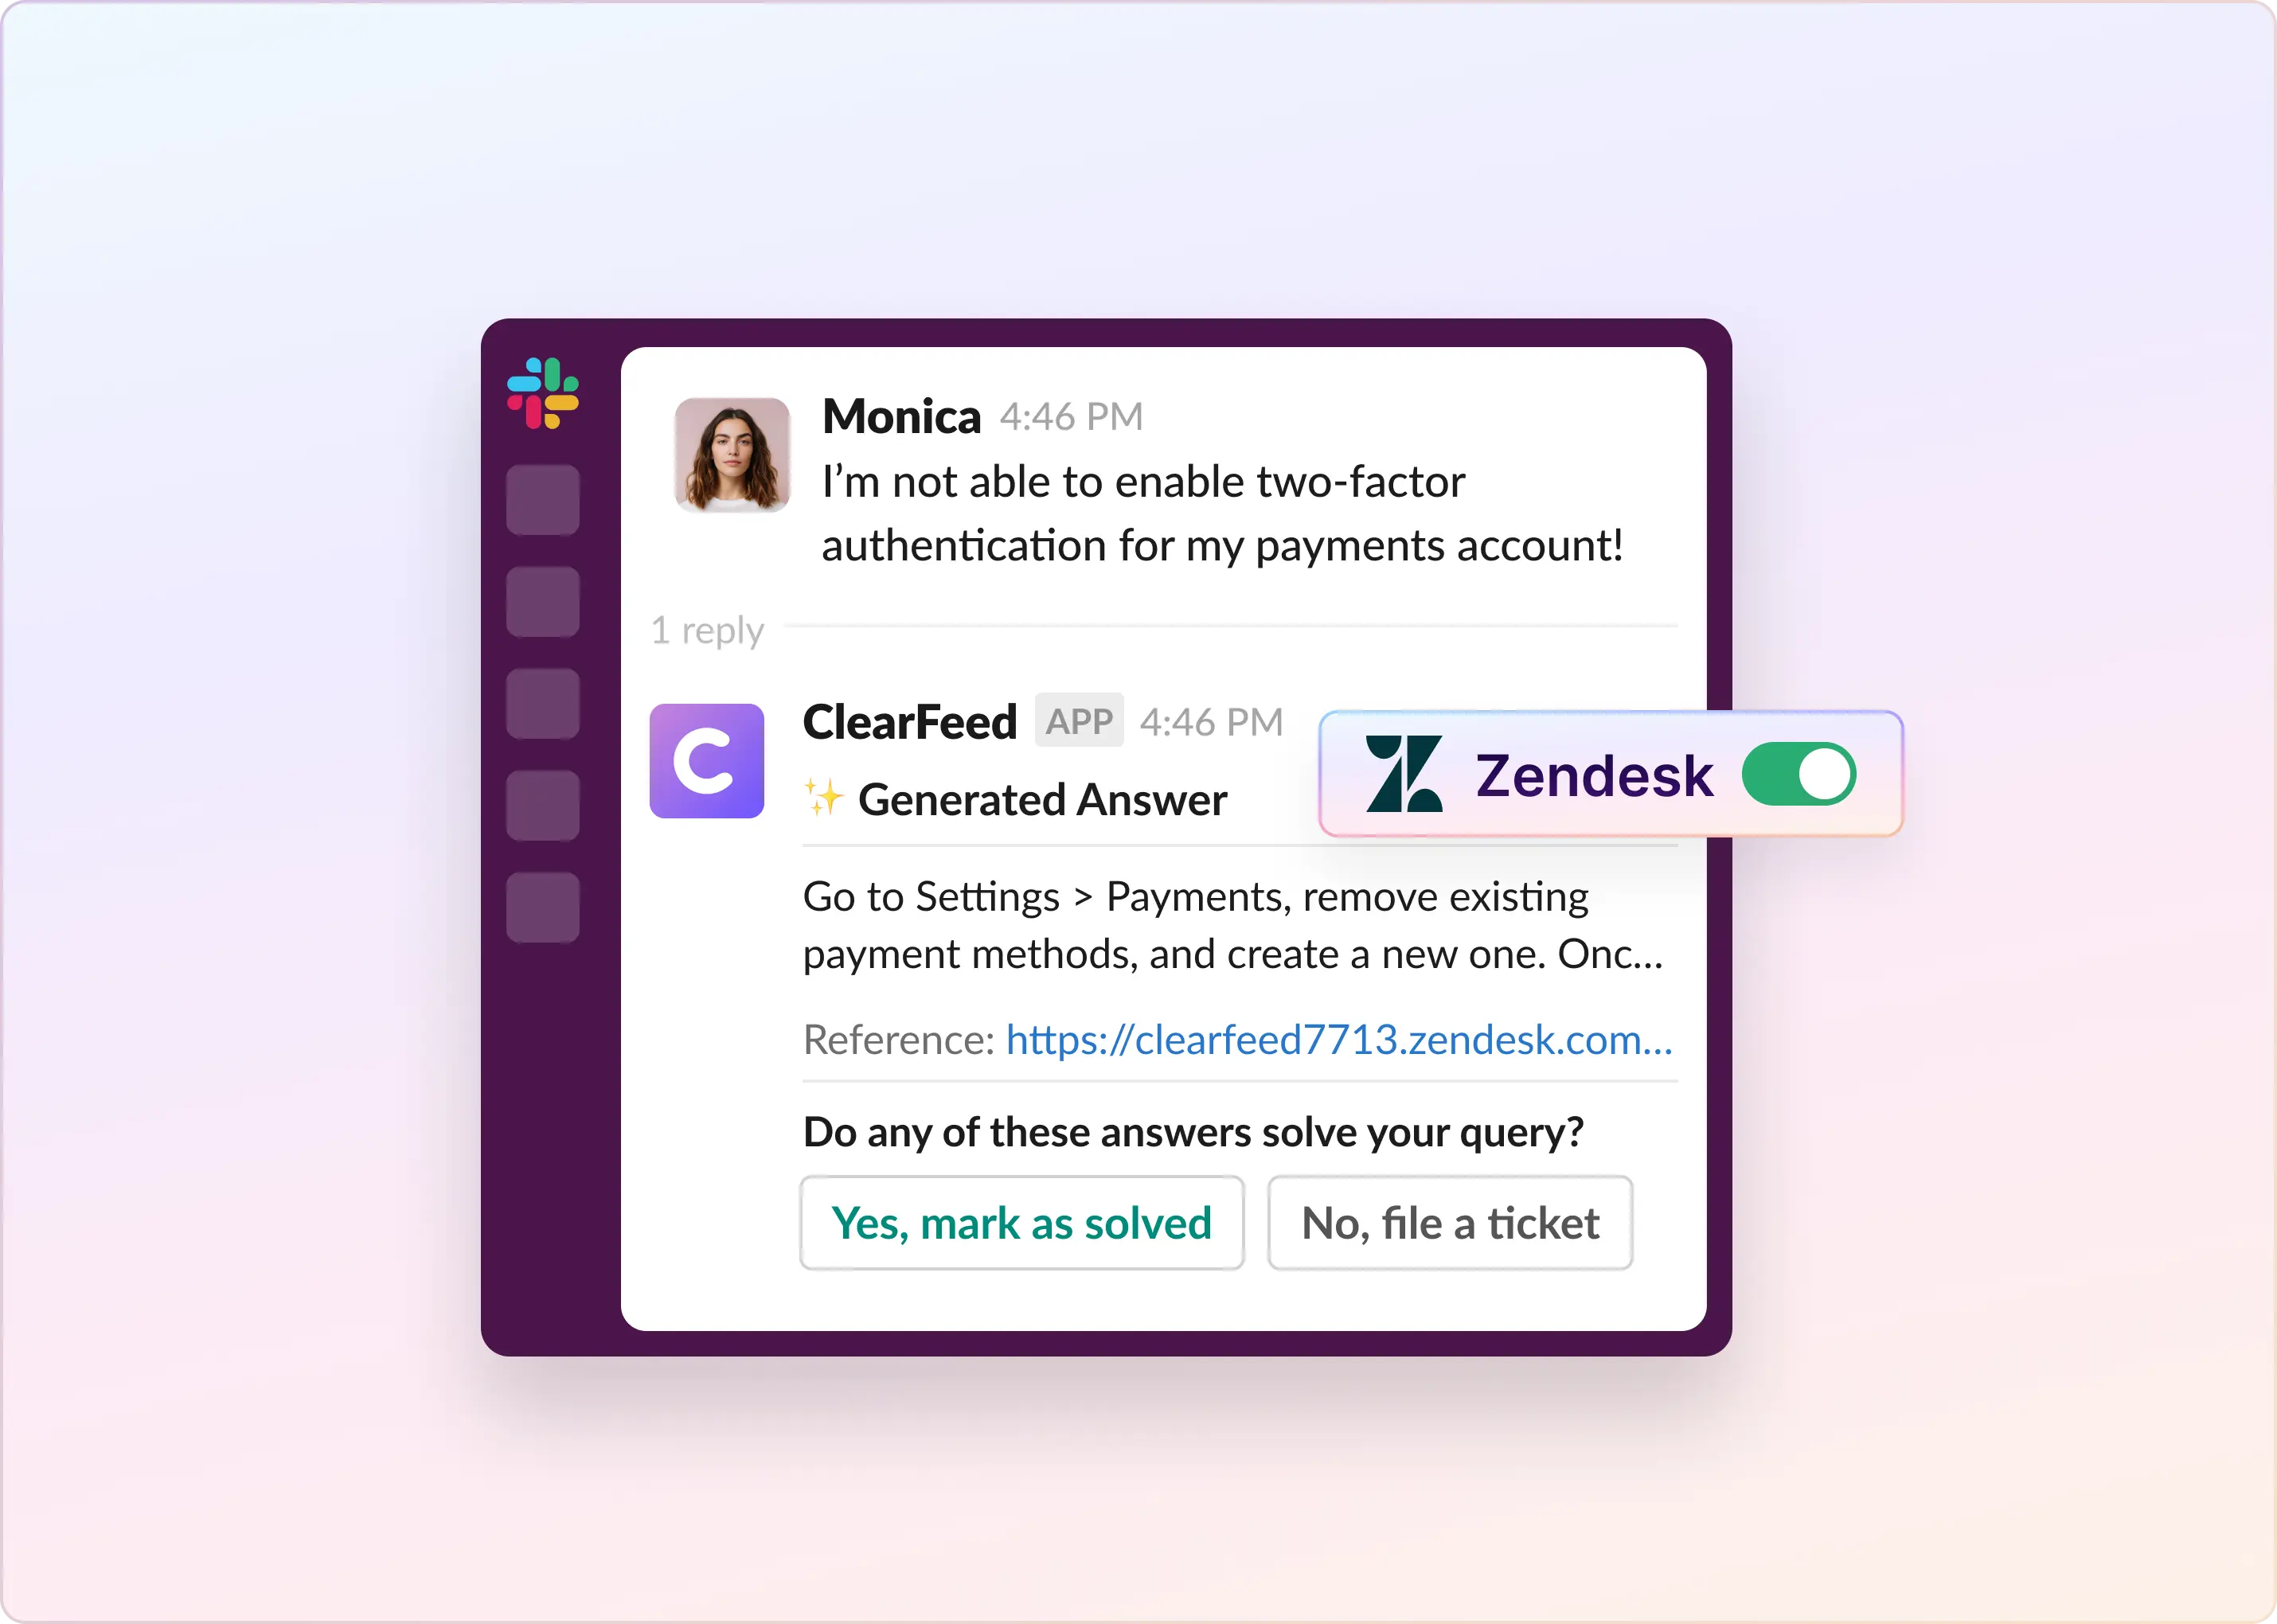
Zendesk makes it easy to create tickets using forms on its platform, including its Help Center and Chat system. However, if you want to use forms to create tickets directly in Slack, Zendesk's Slack app can't do that right now. Instead, you'll need to use other apps, such as ClearFeed or Zapier, to make it work. These apps integrate Slack and Zendesk, enabling you to use Slack forms to create Zendesk tickets.
Creating Zendesk Tickets Using Forms in Slack With ClearFeed
With ClearFeed, users can import Zendesk Forms to create Slack Forms. And create Zendesk Tickets in Slack using these forms. Let’s dive into how:
- Set up a ClearFeed account
- Sign up for ClearFeed
- Connect ClearFeed to your Slack and Zendesk accounts
- Add Slack Channels to ClearFeed from where Tickets will be filed
- Group these Channels into Collections in ClearFeed
ClearFeed also allows filing Zendesk tickets using private messages. See the documentation for setting up ClearFeed and Zendesk.
- Import Zendesk Form in ClearFeed: Once you have connected ClearFeed to your Zendesk account, from the ClearFeed webapp:
- Go to Objects. Pick Zendesk Ticketing
- Click Add Form, then select Import from Zendesk
- Customize the Form
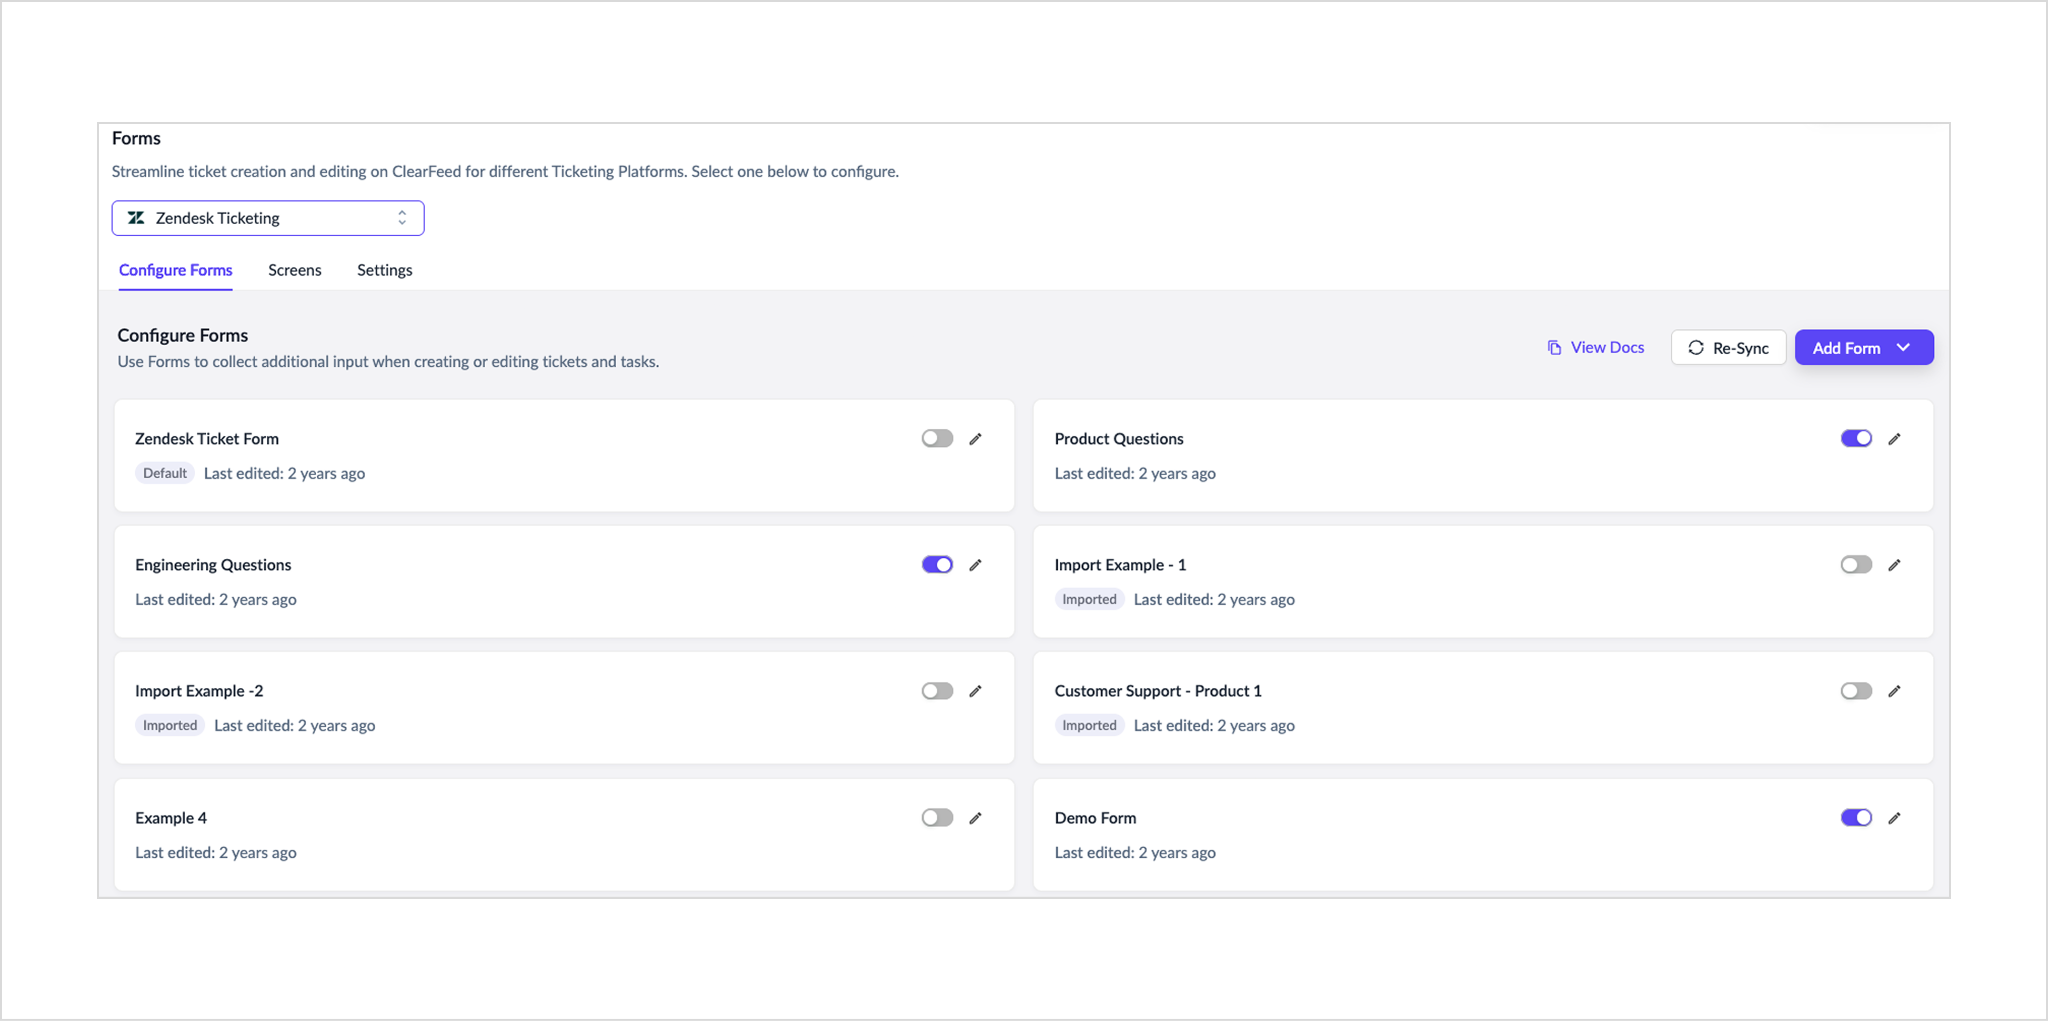
- Choose where to use your forms:
- Pick which groups (Collections) can use each form
- Make sure Zendesk Ticketing is turned on for these groups
This setup helps your team work faster and get all the info they need for each ticket.
Why Is Zendesk Forms Not Perfect?
Here are the key limitations of Zendesk forms:
- Restricted to 300 ticket forms per account: Zendesk allows up to 300 ticket forms per account, which can be limiting for larger teams with many workflows or request types.
- Limited features on lower-tier plans: You can start using Zendesk with the Support Team plan at $19 per agent per month, which covers basic form usage. However, if you need more advanced ticket form capabilities, such as multiple forms and conditional fields, you’ll need a higher-tier plan.
Here’s a quick overview of the Zendesk Support plans relevant to ticket forms:
- Support Team Plan: Starts at $19 per agent per month. Suitable for basic support workflows, but limited for advanced form setups.
- Suite Team: Starts at $55 per agent per month, billed annually. This is the entry-level Suite plan, suitable for teams with basic omnichannel support needs.
- Suite Growth: Starts at $89 per agent per month, billed annually. This is the correct plan to reference if you want to talk about Growth under Zendesk Suite rather than Zendesk Support.
- Suite Professional: Starts at $115 per agent per month, billed annually. This plan is better suited for teams that need deeper collaboration, routing, and reporting capabilities, as well as more advanced support workflows.
Although the forms themselves are not overly expensive, Zendesk's pricing structure can become a significant expense as your business grows. This is because Zendesk operates on a "pay-per-agent" basis, so that costs can escalate quickly with team expansion. If you need advanced form features, upgrading to a higher plan is required and can significantly increase your monthly spend. Also, if you need additional features or want to integrate Zendesk with other tools, you may need to pay for add-ons.
Related Read: How to reduce Zendesk license costs
On the other hand, alternatives like ClearFeed offer similar capabilities for managing forms and tickets at a lower cost and integrate well with tools like Slack, potentially offering better value for growing businesses.
Using ClearFeed and Zendesk To Create a Slack Helpdesk
ClearFeed's Slack-Zendesk integration provides a comprehensive suite of features to streamline customer support operations and improve communication efficiency between the two platforms. Key features include:
- Effortless Ticket Generation: Users can initiate Zendesk tickets directly from Slack conversations by applying a designated emoji. The system employs AI to generate appropriate ticket titles.
- Real-time Synchronization: The integration ensures immediate, bidirectional synchronization of all communications, including attachments, between Slack and Zendesk.
- In-Slack Ticket Management: Support agents can modify ticket fields, escalate issues, and resolve tickets directly within Slack. It eliminates the need to switch between applications.
- Seamless Ticket Association: The system enables easy linking of existing Zendesk tickets to ongoing Slack discussions, promoting context retention and information continuity.
- Multi-platform Communication: The integration enables support agents to engage with customers simultaneously across Slack and Zendesk, facilitating internal discussions while maintaining formal customer communications.
- Streamlined Triage Process: Dedicated triage channels can be established to efficiently manage and categorize incoming customer requests from various sources.
- Automated Ticket Creation: The system can autonomously generate tickets for incoming customer inquiries, thereby optimizing the support workflow.
- GPT-Powered Answers: ClearFeed's Slack integration leverages AI to automatically answer common customer questions. It learns from old Slack messages to handle repeat questions, saving your team time and effort.
Plus, ClearFeed's pricing is based on the number of tickets generated, not the number of agents. This makes it a cost-effective choice for growing teams, unlike Zendesk's agent-based pricing model. Interested in learning more about ClearFeed’s Slack-Zendesk integration? Check out this detailed post here, or book a demo with our team here.