August 10, 2026

How To Build a Ticketing System in Notion?

WRITTEN BY
ClearFeed Team
How To Build a Ticketing System in Notion?
Table of Contents

You probably already run Notion for documentation, wikis, project planning, and team collaboration. So the natural question is whether it can also handle support requests and ticket tracking — without adopting a dedicated helpdesk.

For support, IT, and engineering teams operating in the small-to-medium range, using Notion for tickets is a surprisingly practical starting point. It's flexible, affordable, and already inside your team's daily workflow. That makes it a reasonable alternative to Zendesk or Jira when your needs are still internal and relatively light.

Notion works well for the early stages, but the ceiling is real. This guide covers how to build a working ticketing setup in Notion, where it breaks down, and how to layer a proper helpdesk on top when you outgrow the board.

‍

TL;DR‍

Notion works as a lightweight internal ticketing system for small teams — until SLAs, real routing, and support analytics become non-negotiable.

  • Best fit: small teams managing internal bug reports, IT issues, feature requests, or basic support workflows.
  • Setup: a database with status, priority, assignee, requester, due date, category, and attachments.
  • Useful views: My Tickets, All Tickets, Kanban by status, lifecycle timeline, calendar, and per-requester filters.
  • Intake: Tally, NotionForms, or NoteForms feed submissions into your Notion database.
  • Move on when: ticket volume climbs into hundreds per week, external customers enter the picture, or SLA discipline becomes essential.
  • ClearFeed adds the helpdesk layer Notion doesn't ship with — Slack-first intake, SLAs, assignment rules, forms, reporting, plus AI Agents that answer from your Notion pages.

‍

Why Use Notion as a Ticketing System?

Here's why many teams use Notion to manage tickets: 

  1. Docs, tickets, and collaboration in one workspace: Notion combines documentation, ticket tracking, and team collaboration in one shared space. Instead of jumping between tools to check a ticket's status, you link tickets, SOPs, and updates in the same workspace.‍
  2. Custom workflows without code: You don't need to be a developer to build something usable. Create a database, add fields for status, priority, and assignee, and choose views — Kanban, calendar, filtered lists — that match how your team actually works.‍
  3. Built for collaboration: Real-time updates, @mentions, comments, and file attachments keep discussion attached to the ticket instead of scattered across Slack threads and shared docs.‍
  4. Affordable and scalable: Notion is free for individuals and reasonably priced for teams. Even the free tier is capable enough to run a basic internal ticketing setup, which makes it a natural starting point for lean teams and startups. See Notion's pricing page for current tier details.‍
  5. Connects to the tools you already use: Notion connects to Slack, third-party form builders, and ticketing/AI layers like ClearFeed. Practically speaking: Notion can remain the workspace for documentation and lightweight tracking, while a purpose-built helpdesk layer handles the operational side of support — capturing requests from Slack, email, web chat, Microsoft Teams, or a portal, routing them into a queue, and reading your Notion pages as a knowledge source for AI answers.‍
  6. Built-in knowledge base: Since so many teams already keep their SOPs, product docs, and onboarding guides in Notion, linking tickets to help articles is free. That closes the loop on self-service and cuts repeat questions. It also means your Notion pages are ready to plug into AI Agents that answer routine questions automatically — more on that below.

‍

How To Set Up Notion as a Ticketing System?

You don't need to be a developer or even a Notion expert to build a solid ticketing workflow. All it takes is a structured database, a few useful views, and a couple of templates to streamline common requests.

Here's how to build a setup that works: 

  1. Create a Ticket Database

This is where all your tickets will live. 

  • Open Notion and create a new page, then choose "Table." 
  • Name it "Support Tickets,” "Internal Requests", or anything relevant to your workflow.

Add the following key properties:

Field Type Purpose
Ticket ID Formula/Text Auto-generated or manual reference
Title Title Short description of the request
Description Text Detailed issue/request
Status Select E.g., Open, In Progress, On Hold, Resolved
Priority Select Low, Medium, High, Critical
Requested By Person/Text Who submitted the ticket
Assigned To Person Who’s handling the ticket
Submitted On Created Time When the ticket was submitted
Due Date Date Deadline for resolution
Category Select IT, HR, Finance, Product, etc.
Attachments Files Upload screenshots or supporting docs

‍

Optional fields: Tags (for filtering), Related Docs (help articles), or linked records to other databases.

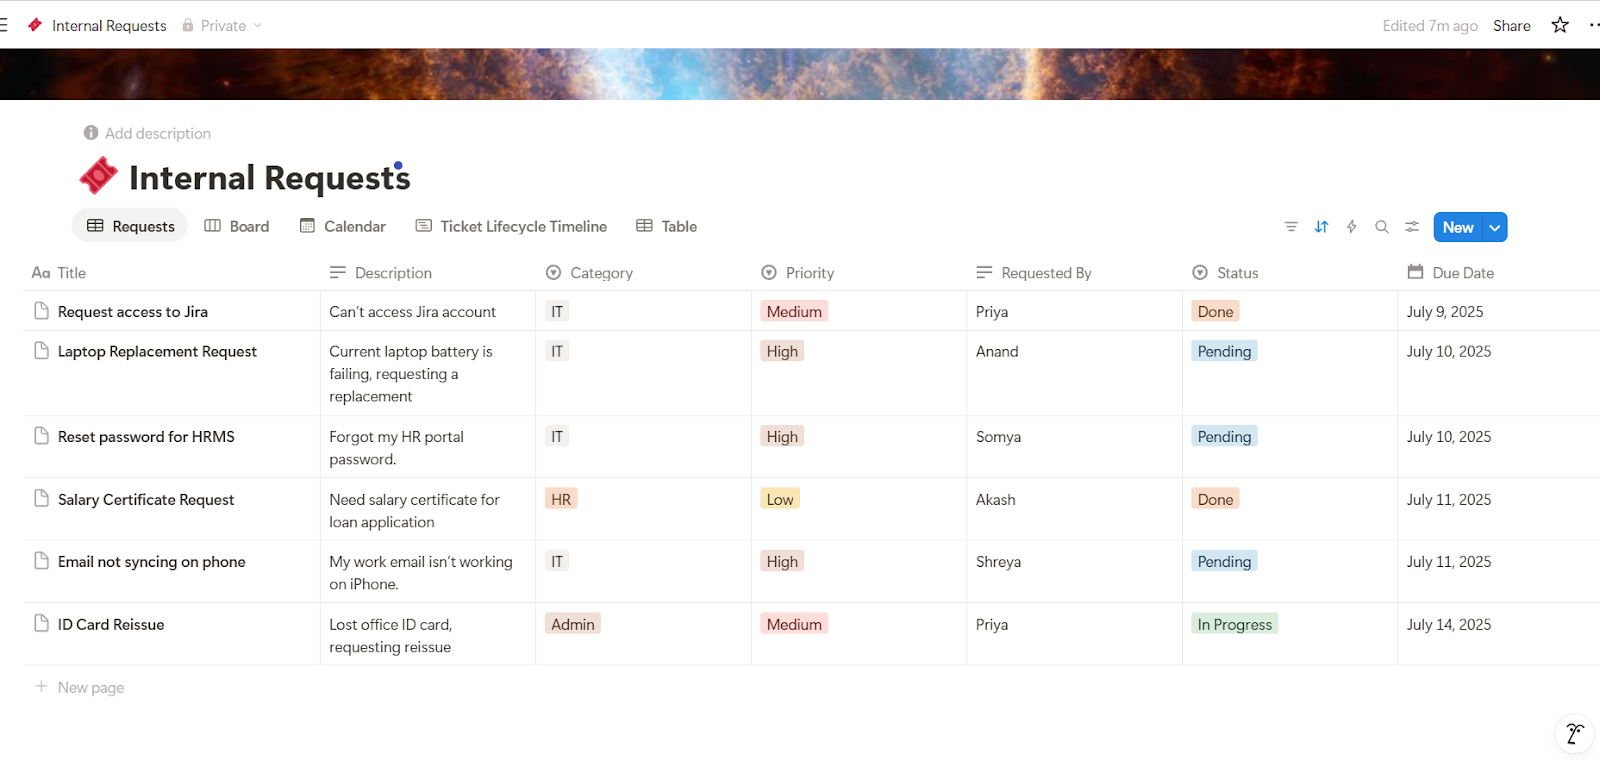
You can continually adjust these properties to better suit your workflow. Notion makes that easy. Here's an example of Internal requests: 
Optional fields
  1. Design Custom Views for Better Navigation

Use filtered database views to give each stakeholder the perspective they need:

  • My Tickets: Filtered to show only those assigned to the current user.
  • Table View (All Tickets): For admins or managers to audit tickets.
  • Kanban View (by Status): For agents to visualize ticket flow.
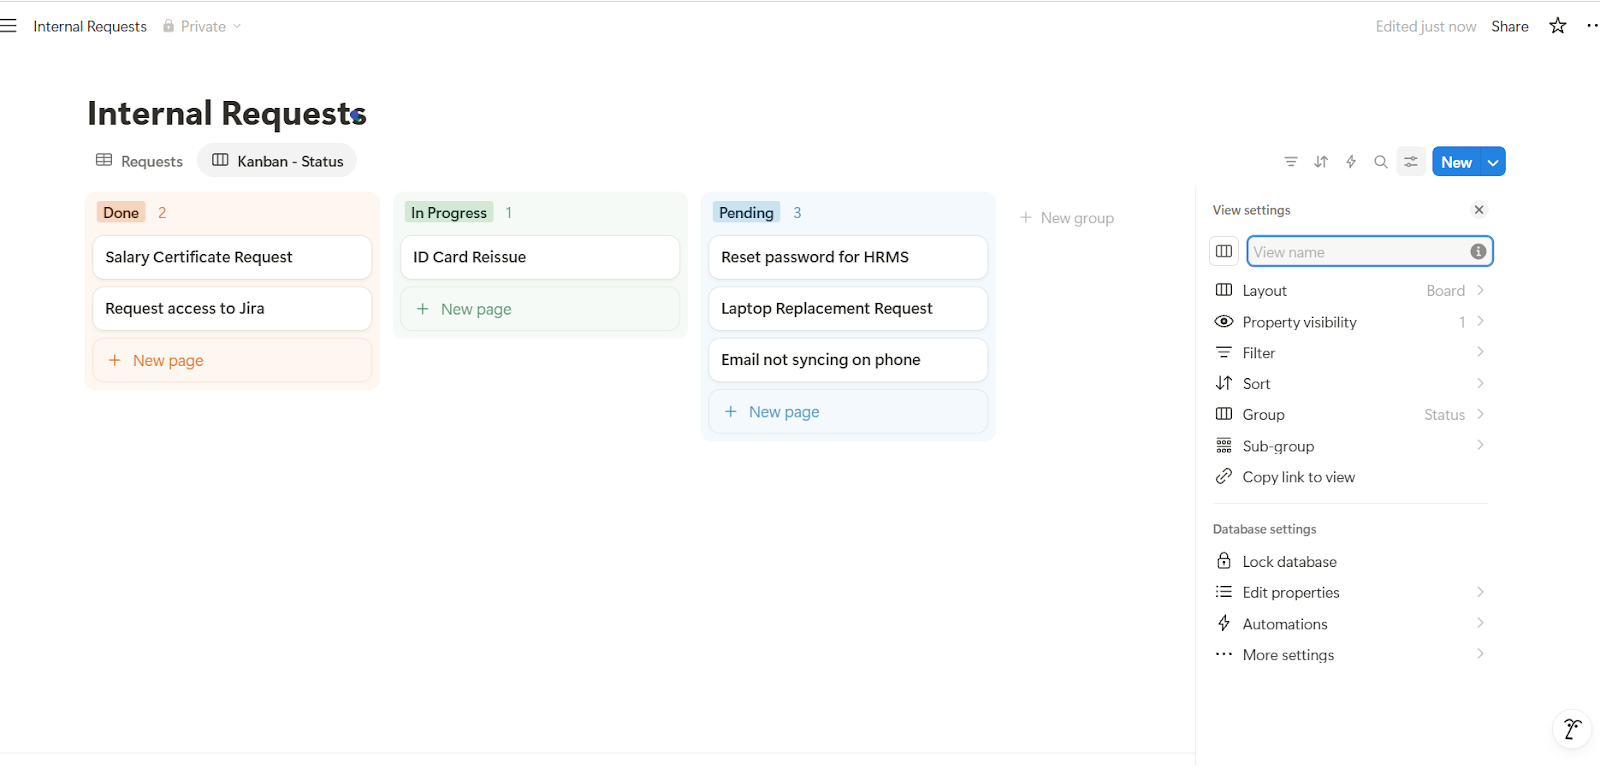
Kanban View (by Status)
  • Ticket Lifecycle Timeline: Displays the journey of each ticket from submission to resolution, allowing managers to track progress over time.
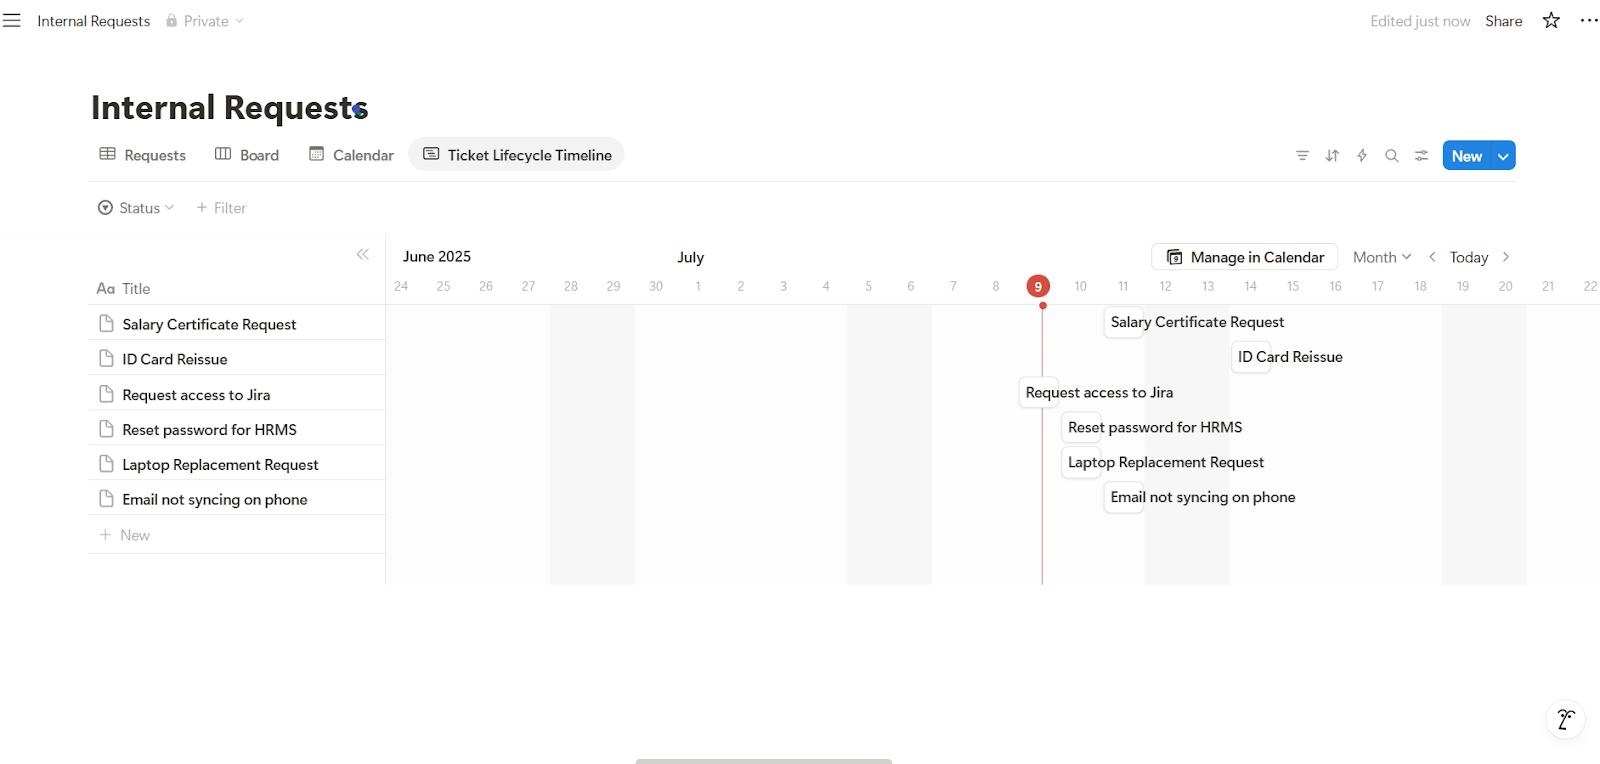
Ticket Lifecycle Timeline
  • Calendar View: To track due dates and resolutions.
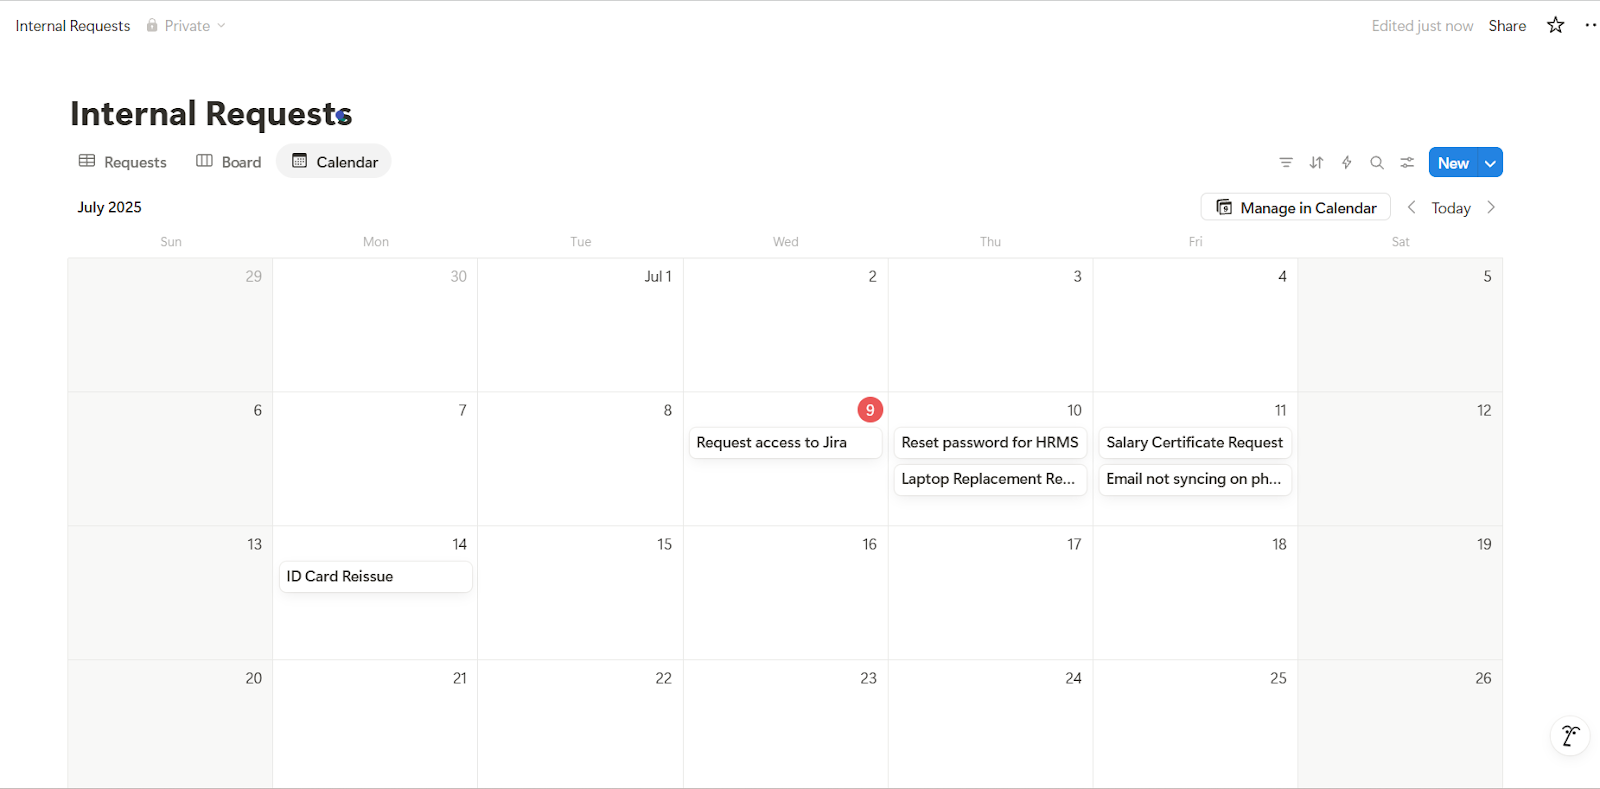
Calendar View
  • Requester's View: For requesters to view only their submitted tickets (internal use).

These views reduce clutter and make navigation intuitive for different users.

  1. Add Forms for Easy Ticket Submission

Not everyone in your team needs edit access to the Notion database. Here’s how to collect tickets easily:

‍

Option A: Internal Submission (Basic):

For team members who already have Notion access:

  • Create a shared page with a linked database that is filtered to show only “Open” tickets. 
  • Add a Template Button labeled “Submit New Ticket” with pre-filled default fields (e.g., Priority = Medium, Status = Open).
  • Users can click the button, fill in the details, and submit without touching other records.
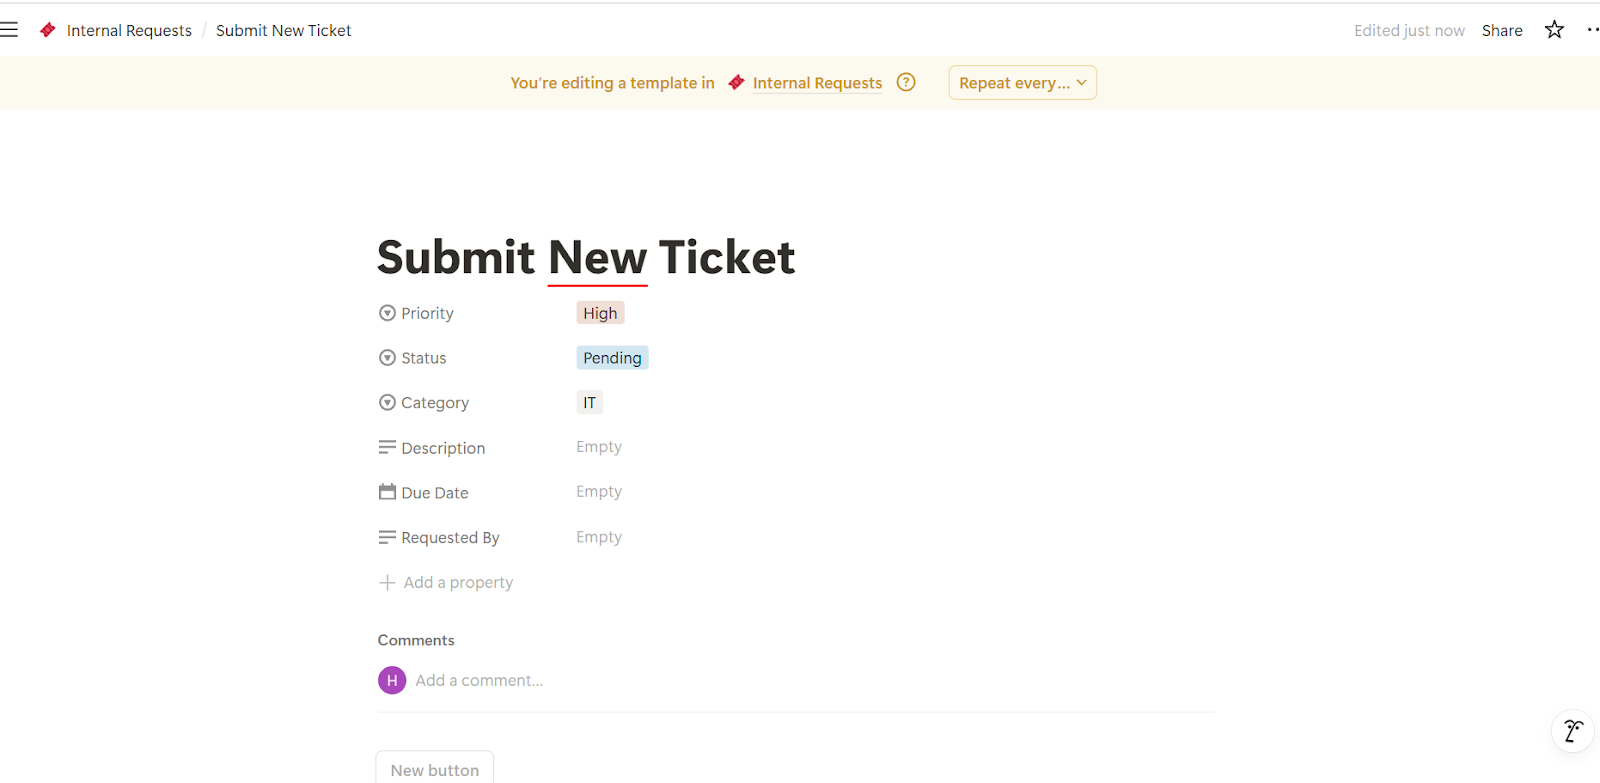
Option A: Internal Submission (Basic)

‍

Option B: External Submission (Advanced):

For clients or team members who don’t have Notion access:

  • Use third-party tools that integrate with Notion and act as a front-end form.
  • Recommended tools: Tally, NotionForms, or NoteForms.
  • These tools let you create simple, shareable forms that automatically add submissions to your Notion database. 
  • You can even embed these forms in Slack, team wikis, or internal portals for a smoother request intake process.

If the request starts in Slack, ClearFeed can reduce much of this intake friction. A message in a request channel can automatically become a ClearFeed request, and teams can convert it into a ticket with a visible ID, status, priority, and assignee. For more structured cases, ClearFeed Forms can collect required fields from Slack, Teams, or the customer portal, including conditional fields that appear only when relevant.

  1. Link to Other Databases for Better Context

Link your tickets to relevant Notion databases to enrich the context and support better tracking.

  • Internal Docs: Use a relation field like "Related Article" to attach help docs
  • Projects or Sprints: Associate support tickets with development work
  • CSAT or Feedback: Link post-resolution feedback to specific tickets
  • Team Directory: Auto-populate departments or roles for assignees

This builds a hub of interconnected info, making your support process smarter.

  1. Assign Ownership & Track Accountability

Use the "Assigned To" property to ensure every ticket has an assigned owner. This helps avoid dropped requests and improves accountability.

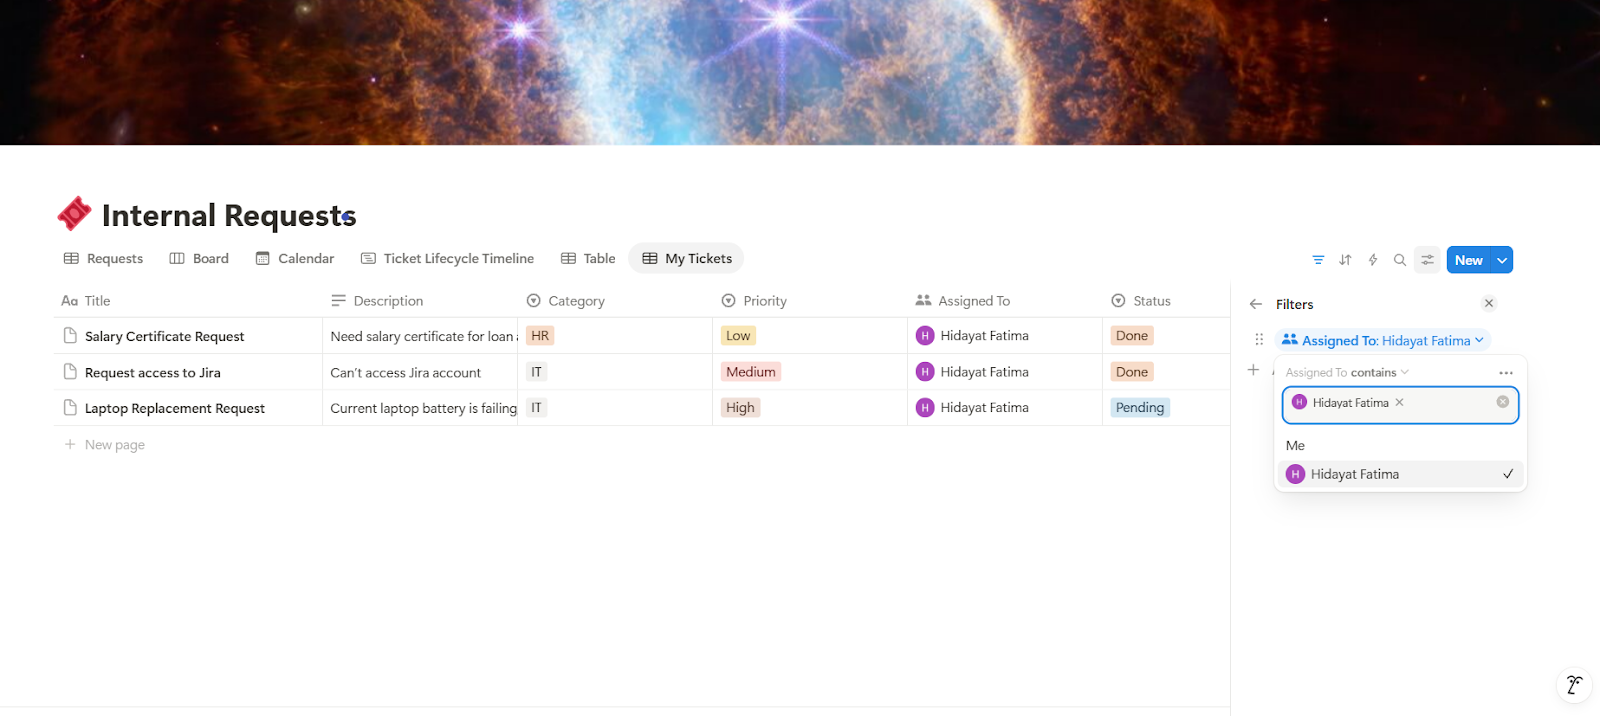
  • Create filtered views, such as “My Tickets,” to allow each team member to see only the tickets assigned to them.
‍

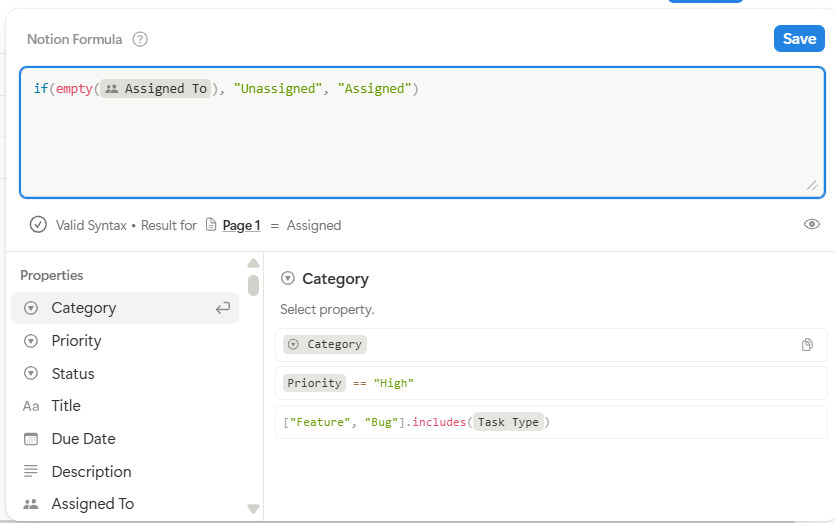
  • Additionally, add a formula property to highlight tickets that haven’t been assigned yet. Use the following formula:

if(empty(prop("Assigned To"), "Unassigned," "Assigned")
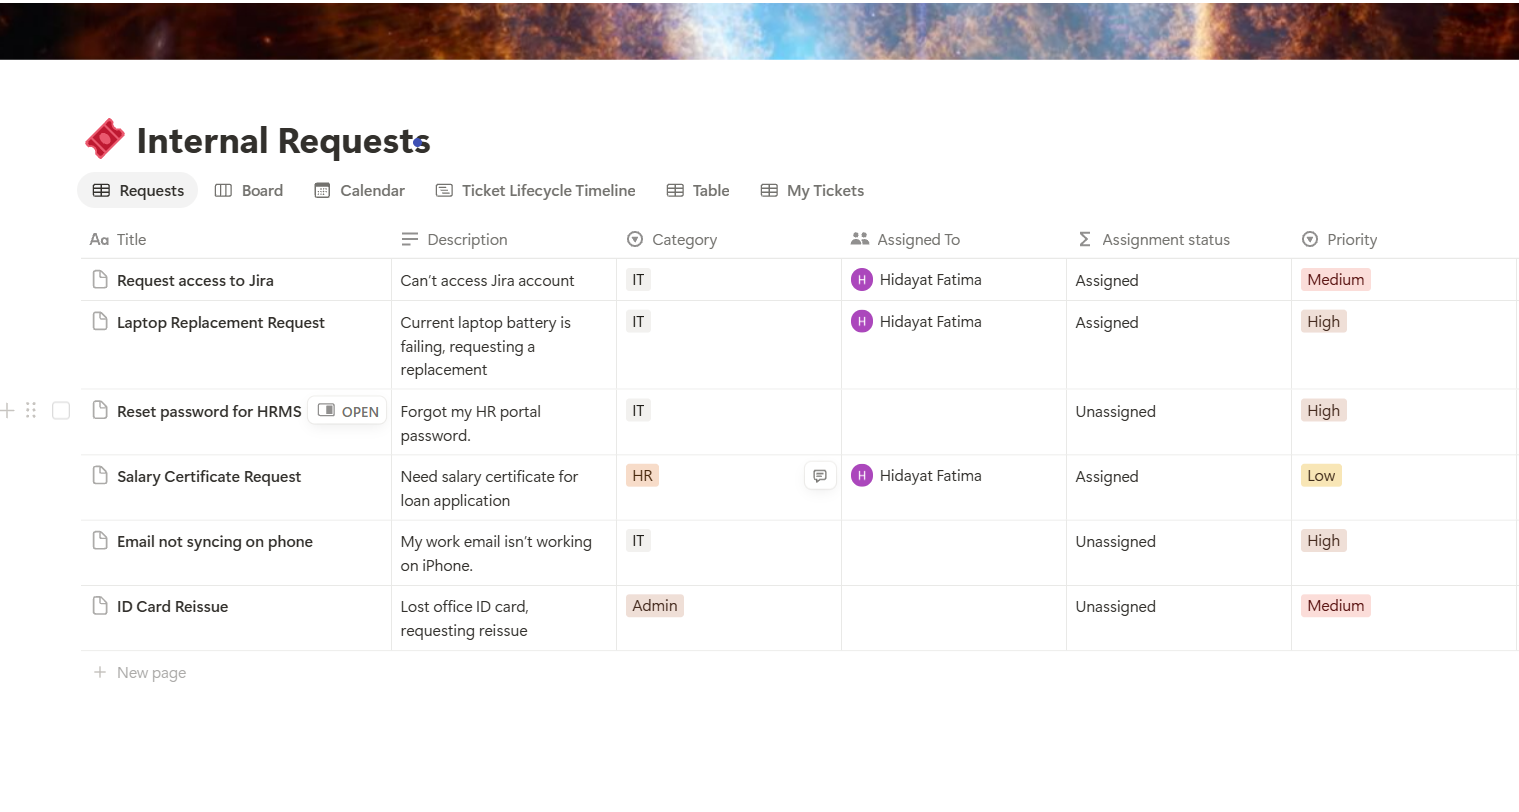
This formula displays “Unassigned” if no owner is set, and “Assigned” otherwise, which makes it easy to spot and assign unclaimed tickets.

  1.  Link a Knowledge Base

Create a separate Notion database called 'Knowledge Base' to store your documentation, including FAQs, SOPs, and onboarding guides.

Then, in your database, add a Relation property (e.g., Related Articles or Linked Docs) that connects to the Knowledge Base.
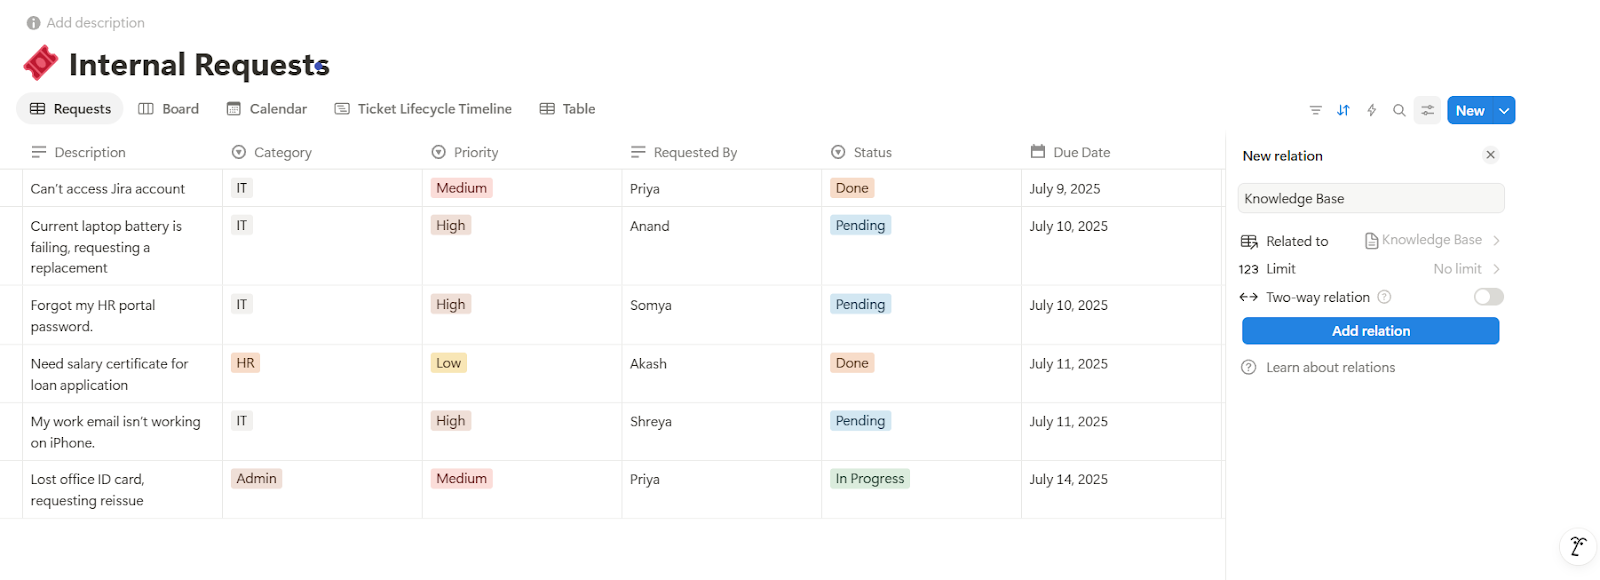
Link a Knowledge Base

Use it to:

  • Attach relevant articles to incoming tickets
  • Identify missing docs by tagging recurring issues
  • Track which articles help reduce ticket volume
  • Encourage self-service for faster resolutions

Over time, this self-service loop reduces workload and improves resolution speed.

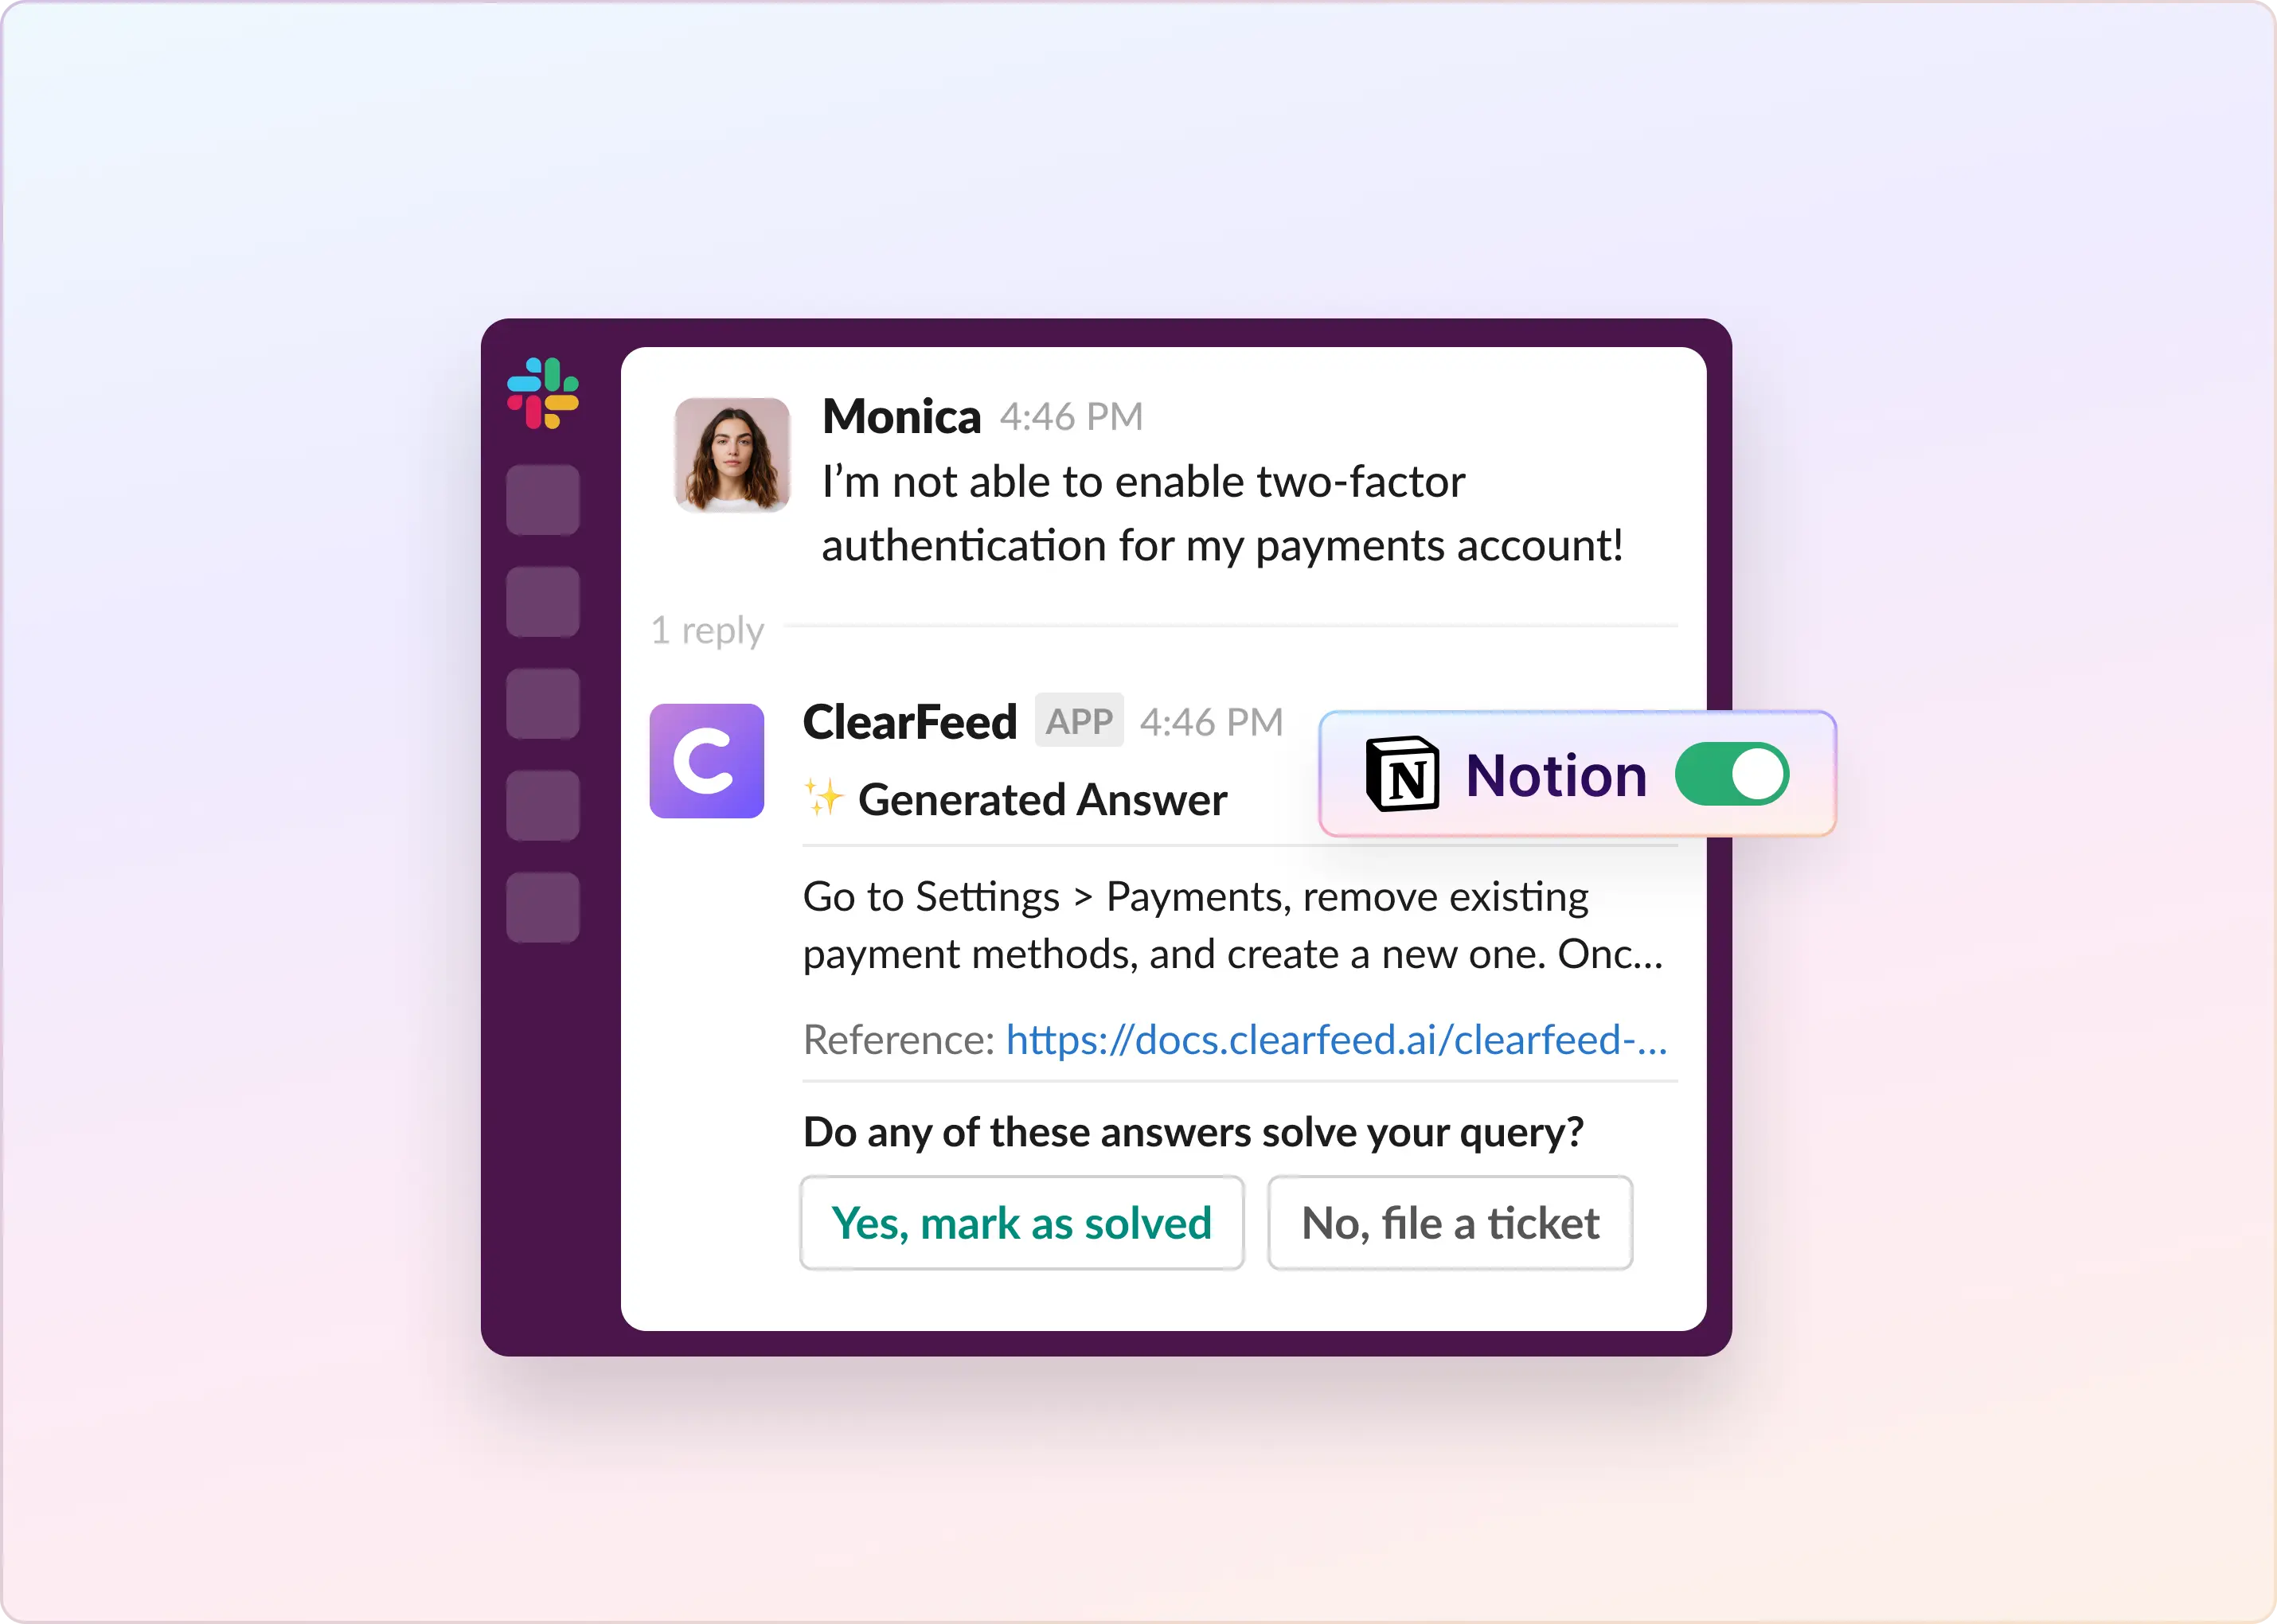
This is also where ClearFeed and Notion work well together instead of replacing each other. Notion can be the living knowledge base, while ClearFeed's Answer Agents use those Notion pages to suggest private replies to agents or respond directly to requesters as a Virtual Agent. ClearFeed can also show references and search results with AI-generated answers, so agents can verify where an answer came from before sending it.

‍

What Are the Limitations of Notion as a Ticketing System?

Notion works well for early-stage ticketing, but it starts to fall short as your support operations grow in size and complexity. 

Here’s where Notion might start holding you back:

  • No built-in automation or SLAs: You can't set response time goals, auto-assign tickets, or trigger escalations without relying on external tools like ClearFeed.
  • Lacks Real-Time Alerts & Notifications: Unless users manually check or follow pages, ticket updates can easily go unnoticed. There's no native notification system for real-time triage.
  • Manual Ticket Routing: No smart routing or queue balancing. Every ticket must be reviewed and assigned manually, which slows down the process as the volume increases.
  • Doesn’t Scale Well Across Teams: As multiple teams (like IT, HR, product, and support) begin to collaborate on tickets, maintaining visibility, ownership, and process consistency becomes difficult.

How do you determine whether to continue developing your support workflow in Notion or switch to a dedicated ticketing system? Let’s find out. 

This is usually the point at which ClearFeed becomes useful as a native helpdesk layer for Notion. It can bring in SLA policies, business-hour schedules, auto-assignment rules, escalation workflows, triage channels, private notes, request views, and reporting, while Notion continues to serve as the source of internal documentation or project context.

‍

When To Stick With Notion vs. When To Move On

To figure out if you’ve outgrown Notion, use the table below to guide your next move:

Stick With Notion When... Move On From Notion When...
Your team is small (SMEs/startups) and handles <50 internal tickets per week Ticket volume is high (100+ per week) and growing rapidly
You need flexible, custom workflows built around your unique internal processes You need structured features like SLAs, auto-routing, or canned replies
You already use Notion for documentation and want to link tickets with SOPs or help guides You need robust reporting and dashboards to monitor KPIs, backlogs, or agent performance
You’re testing and building internal support workflows and want a low-cost starting point You support external customers and need branded portals, email threading, and better UX
You only need basic automation, like auto-creating tickets, sending notifications, or assigning priorities You need enterprise-grade security, compliance, and governance (SOC 2, audit logs, RBAC, etc.)

‍

How ClearFeed Enhances Notion as a Ticketing System

Notion is good at organizing information. It isn't a helpdesk. When ticket volume grows, most teams end up wanting a purpose-built layer that keeps intake, SLAs, and reporting sane — while still using Notion for docs, SOPs, and project context. That's the shape of ClearFeed.

Slack-first intake with a proper support queue

ClearFeed captures requests from Slack, email, web chat, a customer portal, Microsoft Teams, Slack Connect, or an API, and lands them in a structured support queue. Agents work from a Slack triage channel or the ClearFeed web app: update status and priority, assign owners, leave private notes, and keep requesters informed — without maintaining any of it inside a Notion database by hand.

The operational features Notion doesn't ship with

  • SLA policies with business-hour schedules.
  • Auto-assignment rules and escalations.
  • Forms and custom fields for structured intake.
  • Reminders, CSAT surveys, and reporting.
  • Saved views for different teams and squads.

Turn your Notion pages into an AI-powered knowledge source

Connect Notion under Settings → Integrations. Pick the pages ClearFeed should have access to (only those pages become indexable). Then add a Notion Knowledge Source under AI → Knowledge Sources, choose All Pages or Specific Pages, tag it for scoping, and enable auto-reindex on a 24-hour cadence. When Notion pages change, the Knowledge Source stays fresh.

From there, ClearFeed's AI Agents read your Notion pages to answer questions. Two modes:

  • Virtual Agent — the AI responds to requesters directly in Slack or Microsoft Teams.
  • Agent Assistant — the AI suggests answers privately to your support team, who edit and send.

AI Agents can also take supported actions in connected tools — creating and updating records in Jira, Zendesk, HubSpot, Notion, Okta, JumpCloud, Asset Panda, BambooHR, and Kandji — and auto-classify or route requests when configured.

Keep the knowledge base honest with DocAssist

ClearFeed's DocAssist reviews resolved support conversations against your indexed documentation and flags missing, unclear, or outdated content. When agents keep answering the same question a Notion page should already cover, DocAssist surfaces the gap so someone can fix the doc — closing the loop between support and documentation instead of letting the same question keep costing time.

A note on plans

AI Agents and Knowledge Sources are included in ClearFeed's Professional and Enterprise plans. On Starter, they're available via the AI Pack add-on ($20 per month per account), with a one-time 14-day trial available. See ClearFeed's pricing page for full details.

‍

FAQs

  1. Can Notion be used as a ticketing system?

Yes. Notion works well for internal support or small teams. It’s flexible and easy to set up, though not as advanced as tools like Zendesk.

  1. Is the Notion free plan sufficient for managing tickets?

Yes! You can build a functional ticketing workflow on the free plan. You can upgrade to paid plans (starting at $10/month) if you need more features.

  1. Can people outside my team submit tickets in Notion?

Not directly, but you can use third-party tools like Notion Forms or ClearFeed to create public forms that integrate with your Notion database. 

  1. Can I track ticket status and assignments easily in Notion?

Absolutely. You can set up properties such as Status, Assigned To, and Due Date, and use views such as Kanban, Calendar, or filtered tables to track progress and ownership.

  1. What are the limitations of using Notion for ticketing?

Notion lacks built-in SLAs, analytics, or native integrations with email/Slack. For that, you can add tools like ClearFeed to automate and scale your operations.

  1. How to create a ticket on Notion?

Click “New” in your ticket database, fill in the details, and save. You can also use a template for standard requests. If you’re using a form like NotionForms or Tally, simply fill it out, and your ticket will appear in Notion automatically.
You probably already run Notion for documentation, wikis, project planning, and team collaboration. So the natural question is whether it can also handle support requests and ticket tracking — without adopting a dedicated helpdesk.

For support, IT, and engineering teams operating in the small-to-medium range, using Notion for tickets is a surprisingly practical starting point. It's flexible, affordable, and already inside your team's daily workflow. That makes it a reasonable alternative to Zendesk or Jira when your needs are still internal and relatively light.

Notion works well for the early stages, but the ceiling is real. This guide covers how to build a working ticketing setup in Notion, where it breaks down, and how to layer a proper helpdesk on top when you outgrow the board.

‍

TL;DR‍

Notion works as a lightweight internal ticketing system for small teams — until SLAs, real routing, and support analytics become non-negotiable.

  • Best fit: small teams managing internal bug reports, IT issues, feature requests, or basic support workflows.
  • Setup: a database with status, priority, assignee, requester, due date, category, and attachments.
  • Useful views: My Tickets, All Tickets, Kanban by status, lifecycle timeline, calendar, and per-requester filters.
  • Intake: Tally, NotionForms, or NoteForms feed submissions into your Notion database.
  • Move on when: ticket volume climbs into hundreds per week, external customers enter the picture, or SLA discipline becomes essential.
  • ClearFeed adds the helpdesk layer Notion doesn't ship with — Slack-first intake, SLAs, assignment rules, forms, reporting, plus AI Agents that answer from your Notion pages.

‍

Why Use Notion as a Ticketing System?

Here's why many teams use Notion to manage tickets: 

  1. Docs, tickets, and collaboration in one workspace: Notion combines documentation, ticket tracking, and team collaboration in one shared space. Instead of jumping between tools to check a ticket's status, you link tickets, SOPs, and updates in the same workspace.‍
  2. Custom workflows without code: You don't need to be a developer to build something usable. Create a database, add fields for status, priority, and assignee, and choose views — Kanban, calendar, filtered lists — that match how your team actually works.‍
  3. Built for collaboration: Real-time updates, @mentions, comments, and file attachments keep discussion attached to the ticket instead of scattered across Slack threads and shared docs.‍
  4. Affordable and scalable: Notion is free for individuals and reasonably priced for teams. Even the free tier is capable enough to run a basic internal ticketing setup, which makes it a natural starting point for lean teams and startups. See Notion's pricing page for current tier details.‍
  5. Connects to the tools you already use: Notion connects to Slack, third-party form builders, and ticketing/AI layers like ClearFeed. Practically speaking: Notion can remain the workspace for documentation and lightweight tracking, while a purpose-built helpdesk layer handles the operational side of support — capturing requests from Slack, email, web chat, Microsoft Teams, or a portal, routing them into a queue, and reading your Notion pages as a knowledge source for AI answers.‍
  6. Built-in knowledge base: Since so many teams already keep their SOPs, product docs, and onboarding guides in Notion, linking tickets to help articles is free. That closes the loop on self-service and cuts repeat questions. It also means your Notion pages are ready to plug into AI Agents that answer routine questions automatically — more on that below.

‍

How To Set Up Notion as a Ticketing System?

You don't need to be a developer or even a Notion expert to build a solid ticketing workflow. All it takes is a structured database, a few useful views, and a couple of templates to streamline common requests.

Here's how to build a setup that works: 

  1. Create a Ticket Database

This is where all your tickets will live. 

  • Open Notion and create a new page, then choose "Table." 
  • Name it "Support Tickets,” "Internal Requests", or anything relevant to your workflow.

Add the following key properties:

Field Type Purpose
Ticket ID Formula/Text Auto-generated or manual reference
Title Title Short description of the request
Description Text Detailed issue/request
Status Select E.g., Open, In Progress, On Hold, Resolved
Priority Select Low, Medium, High, Critical
Requested By Person/Text Who submitted the ticket
Assigned To Person Who’s handling the ticket
Submitted On Created Time When the ticket was submitted
Due Date Date Deadline for resolution
Category Select IT, HR, Finance, Product, etc.
Attachments Files Upload screenshots or supporting docs

‍

Optional fields: Tags (for filtering), Related Docs (help articles), or linked records to other databases.

You can continually adjust these properties to better suit your workflow. Notion makes that easy. Here's an example of Internal requests: 

Optional fields
  1. Design Custom Views for Better Navigation

Use filtered database views to give each stakeholder the perspective they need:

  • My Tickets: Filtered to show only those assigned to the current user.
  • Table View (All Tickets): For admins or managers to audit tickets.
  • Kanban View (by Status): For agents to visualize ticket flow.
Kanban View (by Status)
  • Ticket Lifecycle Timeline: Displays the journey of each ticket from submission to resolution, allowing managers to track progress over time.
Ticket Lifecycle Timeline
  • Calendar View: To track due dates and resolutions.
Calendar View
  • Requester's View: For requesters to view only their submitted tickets (internal use).

These views reduce clutter and make navigation intuitive for different users.

  1. Add Forms for Easy Ticket Submission

Not everyone in your team needs edit access to the Notion database. Here’s how to collect tickets easily:

‍

Option A: Internal Submission (Basic):

For team members who already have Notion access:

  • Create a shared page with a linked database that is filtered to show only “Open” tickets. 
  • Add a Template Button labeled “Submit New Ticket” with pre-filled default fields (e.g., Priority = Medium, Status = Open).
  • Users can click the button, fill in the details, and submit without touching other records.
Option A: Internal Submission (Basic)

‍

Option B: External Submission (Advanced):

For clients or team members who don’t have Notion access:

  • Use third-party tools that integrate with Notion and act as a front-end form.
  • Recommended tools: Tally, NotionForms, or NoteForms.
  • These tools let you create simple, shareable forms that automatically add submissions to your Notion database. 
  • You can even embed these forms in Slack, team wikis, or internal portals for a smoother request intake process.

If the request starts in Slack, ClearFeed can reduce much of this intake friction. A message in a request channel can automatically become a ClearFeed request, and teams can convert it into a ticket with a visible ID, status, priority, and assignee. For more structured cases, ClearFeed Forms can collect required fields from Slack, Teams, or the customer portal, including conditional fields that appear only when relevant.

  1. Link to Other Databases for Better Context

Link your tickets to relevant Notion databases to enrich the context and support better tracking.

  • Internal Docs: Use a relation field like "Related Article" to attach help docs
  • Projects or Sprints: Associate support tickets with development work
  • CSAT or Feedback: Link post-resolution feedback to specific tickets
  • Team Directory: Auto-populate departments or roles for assignees

This builds a hub of interconnected info, making your support process smarter.

  1. Assign Ownership & Track Accountability

Use the "Assigned To" property to ensure every ticket has an assigned owner. This helps avoid dropped requests and improves accountability.

  • Create filtered views, such as “My Tickets,” to allow each team member to see only the tickets assigned to them.

‍

  • Additionally, add a formula property to highlight tickets that haven’t been assigned yet. Use the following formula:

if(empty(prop("Assigned To"), "Unassigned," "Assigned")

This formula displays “Unassigned” if no owner is set, and “Assigned” otherwise, which makes it easy to spot and assign unclaimed tickets.

  1.  Link a Knowledge Base

Create a separate Notion database called 'Knowledge Base' to store your documentation, including FAQs, SOPs, and onboarding guides.

Then, in your database, add a Relation property (e.g., Related Articles or Linked Docs) that connects to the Knowledge Base.

Link a Knowledge Base

Use it to:

  • Attach relevant articles to incoming tickets
  • Identify missing docs by tagging recurring issues
  • Track which articles help reduce ticket volume
  • Encourage self-service for faster resolutions

Over time, this self-service loop reduces workload and improves resolution speed.

This is also where ClearFeed and Notion work well together instead of replacing each other. Notion can be the living knowledge base, while ClearFeed's Answer Agents use those Notion pages to suggest private replies to agents or respond directly to requesters as a Virtual Agent. ClearFeed can also show references and search results with AI-generated answers, so agents can verify where an answer came from before sending it.

‍

What Are the Limitations of Notion as a Ticketing System?

Notion works well for early-stage ticketing, but it starts to fall short as your support operations grow in size and complexity. 

Here’s where Notion might start holding you back:

  • No built-in automation or SLAs: You can't set response time goals, auto-assign tickets, or trigger escalations without relying on external tools like ClearFeed.
  • Lacks Real-Time Alerts & Notifications: Unless users manually check or follow pages, ticket updates can easily go unnoticed. There's no native notification system for real-time triage.
  • Manual Ticket Routing: No smart routing or queue balancing. Every ticket must be reviewed and assigned manually, which slows down the process as the volume increases.
  • Doesn’t Scale Well Across Teams: As multiple teams (like IT, HR, product, and support) begin to collaborate on tickets, maintaining visibility, ownership, and process consistency becomes difficult.

How do you determine whether to continue developing your support workflow in Notion or switch to a dedicated ticketing system? Let’s find out. 

This is usually the point at which ClearFeed becomes useful as a native helpdesk layer for Notion. It can bring in SLA policies, business-hour schedules, auto-assignment rules, escalation workflows, triage channels, private notes, request views, and reporting, while Notion continues to serve as the source of internal documentation or project context.

‍

When To Stick With Notion vs. When To Move On

To figure out if you’ve outgrown Notion, use the table below to guide your next move:

Stick With Notion When... Move On From Notion When...
Your team is small (SMEs/startups) and handles <50 internal tickets per week Ticket volume is high (100+ per week) and growing rapidly
You need flexible, custom workflows built around your unique internal processes You need structured features like SLAs, auto-routing, or canned replies
You already use Notion for documentation and want to link tickets with SOPs or help guides You need robust reporting and dashboards to monitor KPIs, backlogs, or agent performance
You’re testing and building internal support workflows and want a low-cost starting point You support external customers and need branded portals, email threading, and better UX
You only need basic automation, like auto-creating tickets, sending notifications, or assigning priorities You need enterprise-grade security, compliance, and governance (SOC 2, audit logs, RBAC, etc.)

‍

How ClearFeed Enhances Notion as a Ticketing System

Notion is good at organizing information. It isn't a helpdesk. When ticket volume grows, most teams end up wanting a purpose-built layer that keeps intake, SLAs, and reporting sane — while still using Notion for docs, SOPs, and project context. That's the shape of ClearFeed.

Slack-first intake with a proper support queue

ClearFeed captures requests from Slack, email, web chat, a customer portal, Microsoft Teams, Slack Connect, or an API, and lands them in a structured support queue. Agents work from a Slack triage channel or the ClearFeed web app: update status and priority, assign owners, leave private notes, and keep requesters informed — without maintaining any of it inside a Notion database by hand.

The operational features Notion doesn't ship with

  • SLA policies with business-hour schedules.
  • Auto-assignment rules and escalations.
  • Forms and custom fields for structured intake.
  • Reminders, CSAT surveys, and reporting.
  • Saved views for different teams and squads.

Turn your Notion pages into an AI-powered knowledge source

Connect Notion under Settings → Integrations. Pick the pages ClearFeed should have access to (only those pages become indexable). Then add a Notion Knowledge Source under AI → Knowledge Sources, choose All Pages or Specific Pages, tag it for scoping, and enable auto-reindex on a 24-hour cadence. When Notion pages change, the Knowledge Source stays fresh.

From there, ClearFeed's AI Agents read your Notion pages to answer questions. Two modes:

  • Virtual Agent — the AI responds to requesters directly in Slack or Microsoft Teams.
  • Agent Assistant — the AI suggests answers privately to your support team, who edit and send.

AI Agents can also take supported actions in connected tools — creating and updating records in Jira, Zendesk, HubSpot, Notion, Okta, JumpCloud, Asset Panda, BambooHR, and Kandji — and auto-classify or route requests when configured.

Keep the knowledge base honest with DocAssist

ClearFeed's DocAssist reviews resolved support conversations against your indexed documentation and flags missing, unclear, or outdated content. When agents keep answering the same question a Notion page should already cover, DocAssist surfaces the gap so someone can fix the doc — closing the loop between support and documentation instead of letting the same question keep costing time.

A note on plans

AI Agents and Knowledge Sources are included in ClearFeed's Professional and Enterprise plans. On Starter, they're available via the AI Pack add-on ($20 per month per account), with a one-time 14-day trial available. See ClearFeed's pricing page for full details.

‍

FAQs

  1. Can Notion be used as a ticketing system?

Yes. Notion works well for internal support or small teams. It’s flexible and easy to set up, though not as advanced as tools like Zendesk.

  1. Is the Notion free plan sufficient for managing tickets?

Yes! You can build a functional ticketing workflow on the free plan. You can upgrade to paid plans (starting at $10/month) if you need more features.

  1. Can people outside my team submit tickets in Notion?

Not directly, but you can use third-party tools like Notion Forms or ClearFeed to create public forms that integrate with your Notion database. 

  1. Can I track ticket status and assignments easily in Notion?

Absolutely. You can set up properties such as Status, Assigned To, and Due Date, and use views such as Kanban, Calendar, or filtered tables to track progress and ownership.

  1. What are the limitations of using Notion for ticketing?

Notion lacks built-in SLAs, analytics, or native integrations with email/Slack. For that, you can add tools like ClearFeed to automate and scale your operations.

  1. How to create a ticket on Notion?

Click “New” in your ticket database, fill in the details, and save. You can also use a template for standard requests. If you’re using a form like NotionForms or Tally, simply fill it out, and your ticket will appear in Notion automatically.
Related Blogs

See all Blog Posts
TOC heading
Text LinkText Link Active
Get a Free consultation with a Support Expert
Learn how fast growing companies like Teleport, Chronosphere and Acryl Data have scaled Support processes with ClearFeed
Thank you for contacting us. Our team will reach out to you shortly.
Oops! Something went wrong while submitting the form.